Manim 入门
在manim根目录下面建立start.py文件
1 | manim/ |
从例程开始
1 | from manimlib import * |
执行命令
1 | manimgl start.py SquareToCircle |
产生一个红色粉圈的圆点

可以使用键盘鼠标移动画面
- 滚动鼠标中键来上下移动画面
- 按住键盘上 z 键的同时滚动鼠标中键来缩放画面
- 按住键盘上 f 键的同时移动鼠标来平移画面
- 按住键盘上 d 键的同时移动鼠标来改变三维视角
- 按下键盘上 r 键恢复到最初的视角
最后,你可以通过按 q 来关闭窗口并退出程序.
整个代码算是定义了一个类SquareToCircle,它是Scene的子类,然后重写了父类的函数construct
1 | def construct(self) -> None: |
从这个函数中的注释看,应该在该函数中定义所有动画.
然而貌似这只是创建了一个类,并没有实例化啊
在执行命令时已经暗藏玄机了
为了运行这个程序绘制动画,我们并没有使用
1 | python start.py |
这个命令,如果真的这样写了什么都不会发生,因为我们就创建了一个子类但是没有实例化,相当于没有任何动作
我们事实上用到的命令是
1 | manimgl start.py SquareToCircle |
这后面跟着一个参数SquareToCircle,可以大胆的猜测,
manimgl使用start.py这个文件中的SquareToCircle类创造实例去了,然后就执行了construct函数中的动作
之前从来没有学过python,从manim的main模块入手,看看控制流是怎么样的
从命令行开始的控制流
main模块
1 | #!/usr/bin/env python |
main函数里首先打印了manim版本信息,运行时也是这样的
1 | PS D:\manim> manimgl start.py SquareToCircle |
然后调用了manim命令行的语法分析器,将结果保存到args数组中
这个语法分析器干了啥呢?
2
3
4
5
6
7
8
9
10
11
12
13
14
15
16
17
18
19
20
21
try:
parser = argparse.ArgumentParser()
module_location = parser.add_mutually_exclusive_group()
module_location.add_argument(
"file",
nargs="?",
help="Path to file holding the python code for the scene",
)
parser.add_argument(
"scene_names",
nargs="*",
help="Name of the Scene class you want to see",
)
parser.add_argument...
parser.add_argument(
"--log-level",
help="Level of messages to Display, can be DEBUG / INFO / WARNING / ERROR / CRITICAL"
)
args = parser.parse_args()
return args调用了python自带的参数语法分析器,然后给他添加了很多规则
目标模块位置不包括在参数内,目标模块位置的键叫做”file”
对于参数,添加了一些键比如”scene_names”,”–log-level”等等
最后用args数组保存语法分析器的运行结果
以后再写shell的时候可以借鉴python的语法分析器了
因此main函数中调用args.version,args.log_level等等都是args数组中的键了
如果命令行参数有表明本次执行命令是为了修改设置的(if args.config),
则调用manimlib.utils.init_config.init_customization将命令行给出的各种参数保存到库中
否则,即本次命令不是为了设置,那么就是为了运行动画了
调用manimlib.extract_scene.main用scenes数组保存所有场景类的实例,
这个函数干了啥呢?
2
3
4
5
6
7
8
9
10
module = config["module"]
scene_config = get_scene_config(config)
if module is None:
# If no module was passed in, just play the blank scene
return [BlankScene(**scene_config)]
all_scene_classes = get_scene_classes_from_module(module)
scenes = get_scenes_to_render(all_scene_classes, scene_config, config)
return scenesconfig来自库中的设置,也可以命令行上修改
module获取命令行指定的模块名
scene_config获取场景设置
如果命令行上没有传递目标模块,则执行默认的黑色场景
all_scene_classes从目标模块module中获取所有的scene子类
2
3
4
5
6
7
8
9
10
11
if hasattr(module, "SCENES_IN_ORDER"):
return module.SCENES_IN_ORDER
else:
return [
member[1]
for member in inspect.getmembers(
module,
lambda x: is_child_scene(x, module)#判断是否是scene的子类
)
]然后get_scenes_to_render将每个scene子类实例化,并返回对象数组
然后遍历scenes数组,逐一运行每一个场景实例
1 | for scene in scenes: |
调用的是每个对象的run函数
run函数干了啥呢?它进行了一些设置,比如设置动画开始运行的时间,
1 | run()-> |
终于就调用到我们自己写的construct函数了
总结:
主模块干了这么几件事:
1.语法分析,分割命令行
2.获取目标模块中的所有scene的子类,并给每个该种类创建实例
3.遍历执行每个该种类的run函数,run会首先调用construct绘制动画,然后调用interact,允许用户和动画调用
这大概就是控制流的方向
自定义construct
粗略地看完控制流,回到start.py中,看看construct是怎么写的
1 | def construct(self): |
创建了一个Circle类的实例,然后调用两个setter函数设置了图形的填充颜色,边线颜色,
然后把该实例添加到SquareToCircle实例的mobjects数组中,该数组用来存放需要被动画演示的对象
可以大胆推测,当SquareToCircle实例创建之后会遍历mobjects数组演示这些对象
那么Circle类是怎么定义的呢?
1 | class Circle(Arc): |
这个Circle类已经经过了层层继承,算是曾曾曾…孙子类了
object
1 | classDiagram |
添加动画
1 | from manimlib import * |
相比于上一次,增加了一个展示创建矩形和矩形变圆圈的动画
1 | square = Square() |
启用交互
在最后加上一句
1 | self.embed() |
当该函数执行之后,iPython终端会变成
1 | In [1]: play(circle.animate.stretch(4, dim=0)) |
In [n]:之后输入命令就可以了
此时所有的函数都是对作用于selft的,play就相当于self.play,当然写着self.也不会错
在iPython终端上调用play(ReplacementTransform(circle, square)),就实现了从矩形再变灰圆圈
manim命令行
环境变量Path里有一个python<版本号>\Scripts\目录

这下面不知道什么时候就有了

也就是说不从manim 根目录下面也可以使用该命令
1 | manimgl <code>.py <Scene> <flags> |
其中
<code>.py是源文件
<scene>是要渲染的场景类,如果不写并且<code>.py中只有一个类,则渲染这个类,否则需要列出所有类
<flags>选项
flags选项
常用的有
-w把场景写入文件-o把场景写入文件并打开-s跳到最后只展示最后一帧-so保存最后一帧并打开-n <number>跳到场景中第n个动画-f打开窗口全屏
-w,-o
比如manimgl start.py -w之后默认会在当前工作目录下面生成一个video文件夹,
里面有一个SquareToCircle.mp4文件,显然是按照场景类名命令的文件名
可以使用--video_dir VIDEO_DIR修改该导出目录
-o选项的作用类似于-w,只不过导出文件后又打开了
-n number
-n <number>跳转到场景中的第n个动画,啥意思呢?
每一个self.play都是一个动画
1 | self.play(ShowCreation(square)) #第一个动画 |
-n number1,bumber2…只渲染指定的动画
-c <color>
设置背景颜色,比如WHITE就是白色
更多参数
个性化设置
在manim的各级子目录下面都可以建立custom_config.yml文件
子目录终端custom_config.yml会覆盖父目录中custom_config.yml的设置
只要有custom_config.yml,就会覆盖manim/manimlib/default_config.yml中的设置
命令行上的设置又会覆盖所有yml中的设置
1 | manim/ |
也可以在命令行上手工指定配置文件的位置
1 | manimgl project/code.py --config_file /path/to/custom_config.yml |
这个配置文档应该怎么写呢?
manim/manimlib/default_config.yml给出了样本
1 | directories: |
Manim项目结构

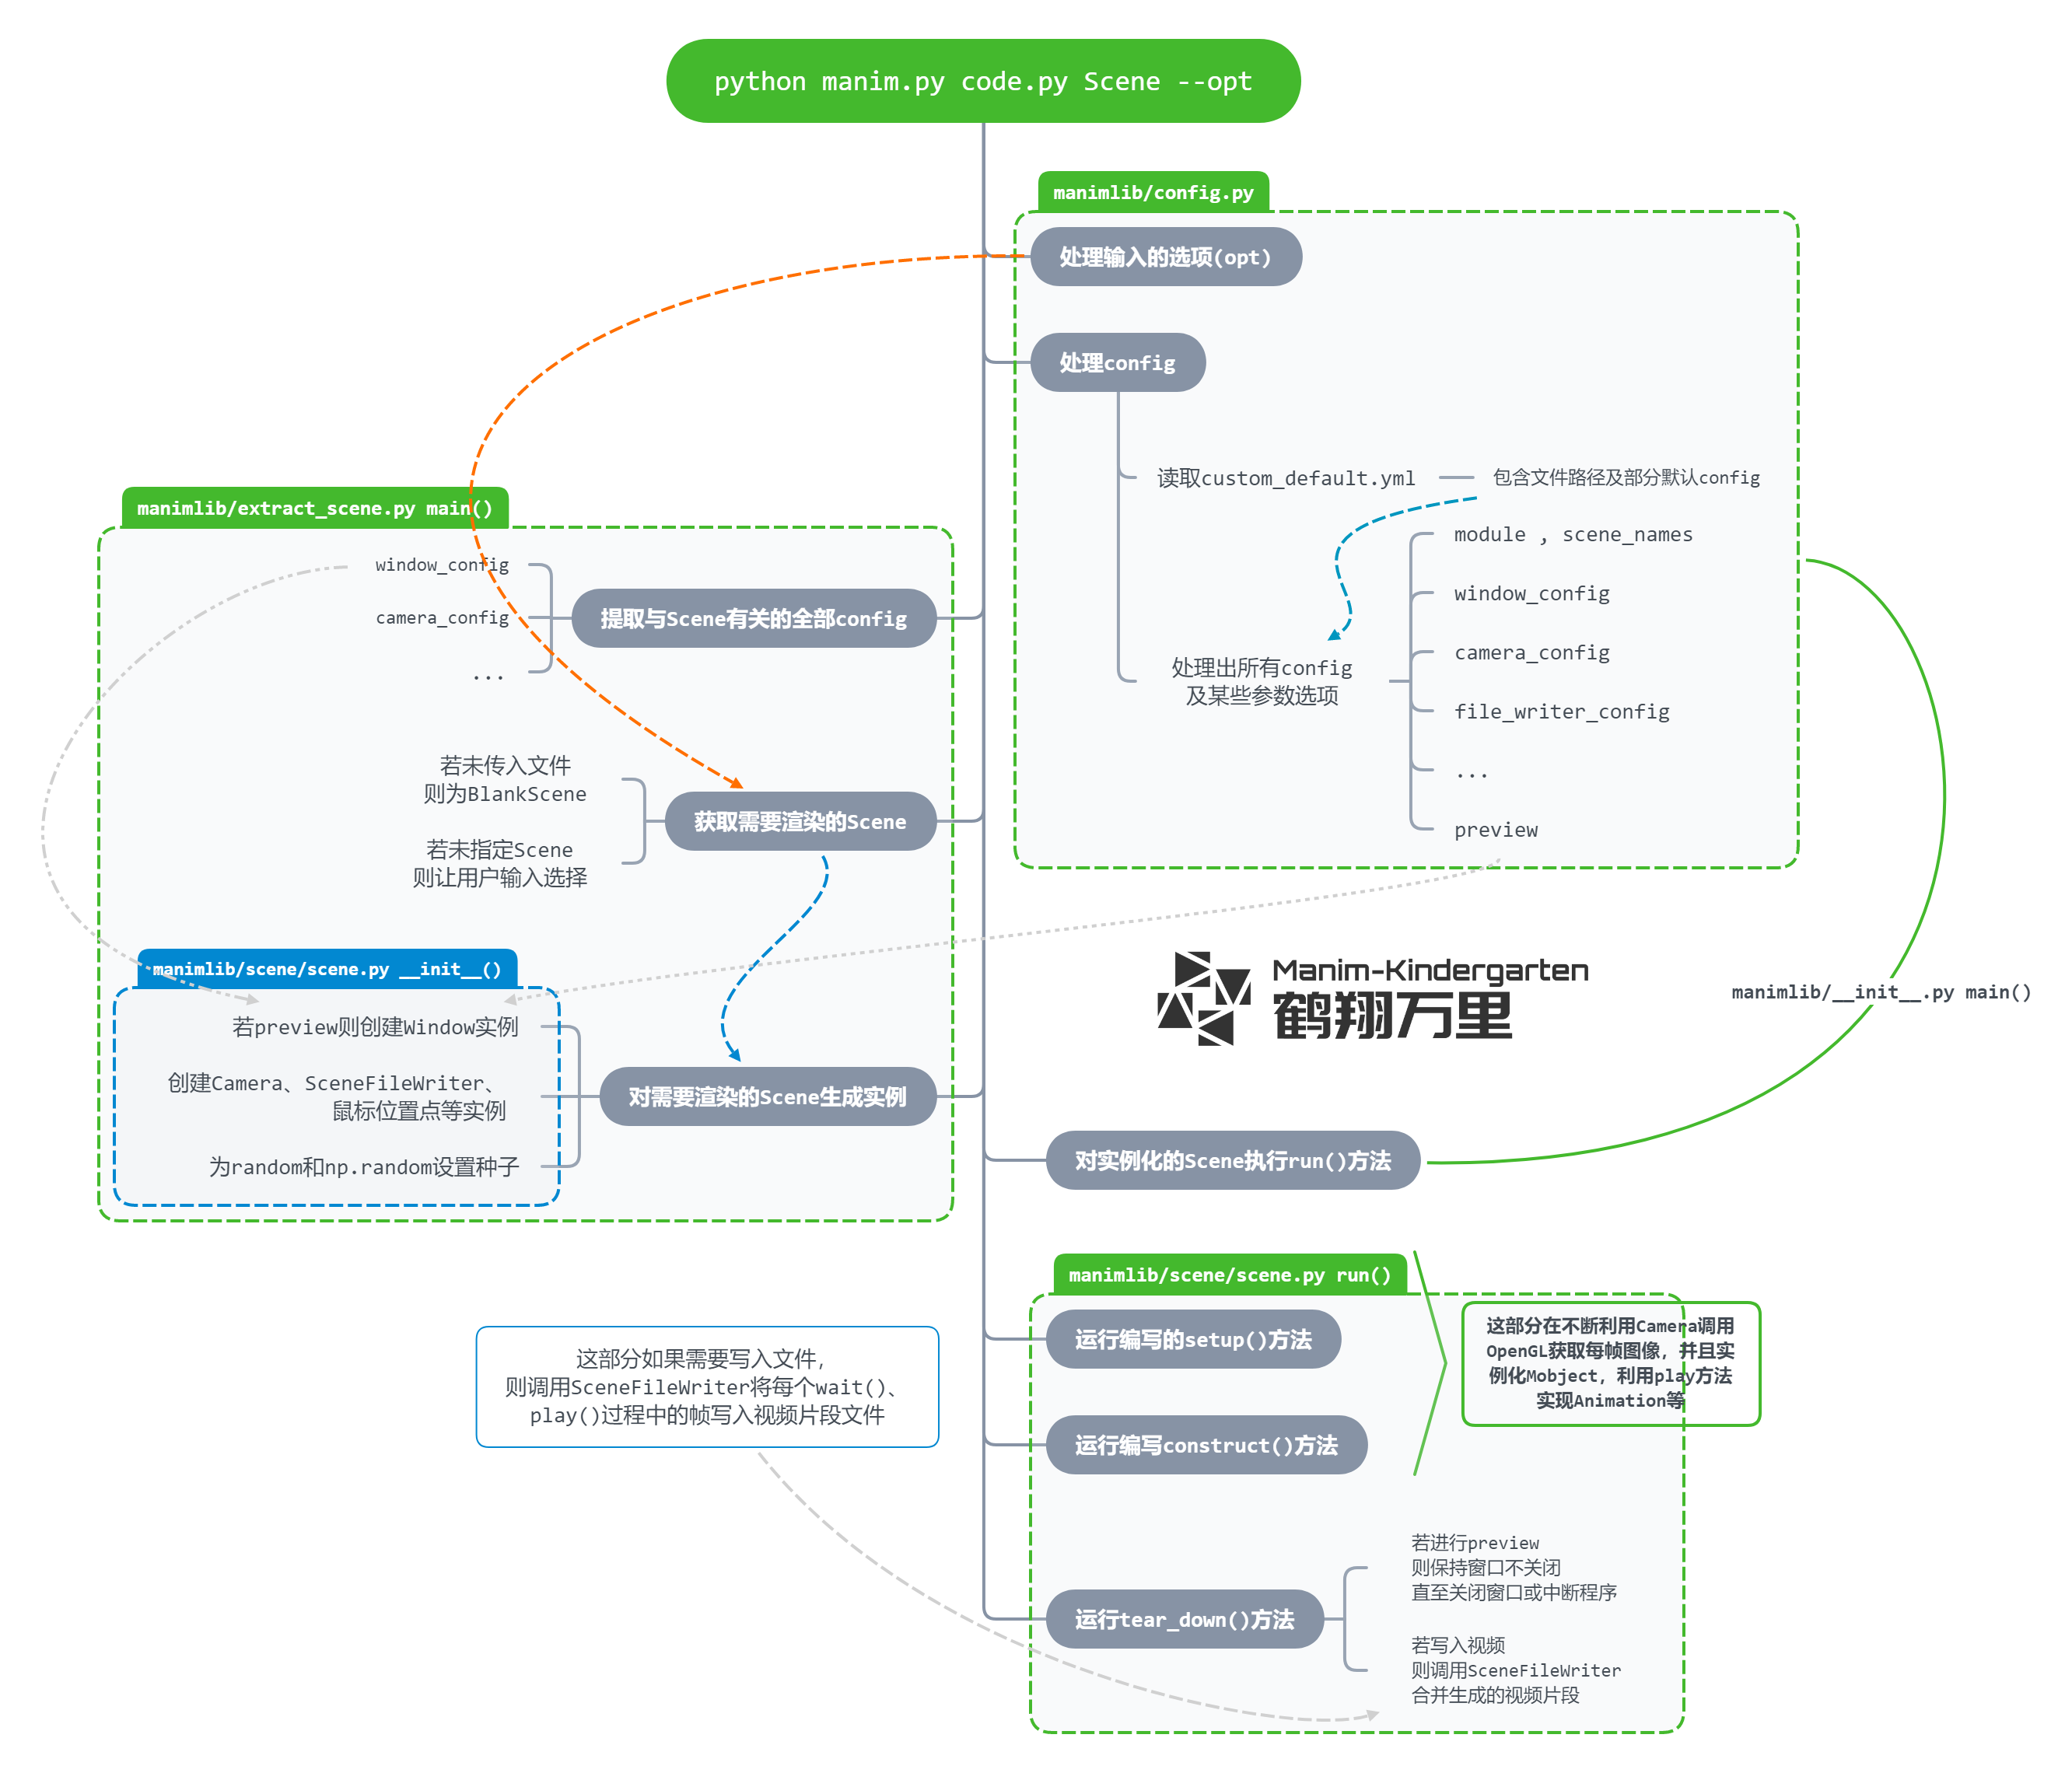
Manim完整控制流