内核调试 [TOC]
调试环境 编译内核 1 2 3 4 5 cd /usr/src wget https://mirrors.tuna.tsinghua.edu.cn/kernel/v6.x/linux-6.7.tar.gz tar -xzf linux-6.7.tar.gz cd linux-6.7 make menuconfig
Kernel hakcing->
Compile-time checks and compiler options->
Debug information->Rely on the toolchain’s implicit default DWARF version
或者矮人4或者矮人5格式的调试信息都可以,只要是带着调试信息就可
配置完成之后
等待编译链接完成之后
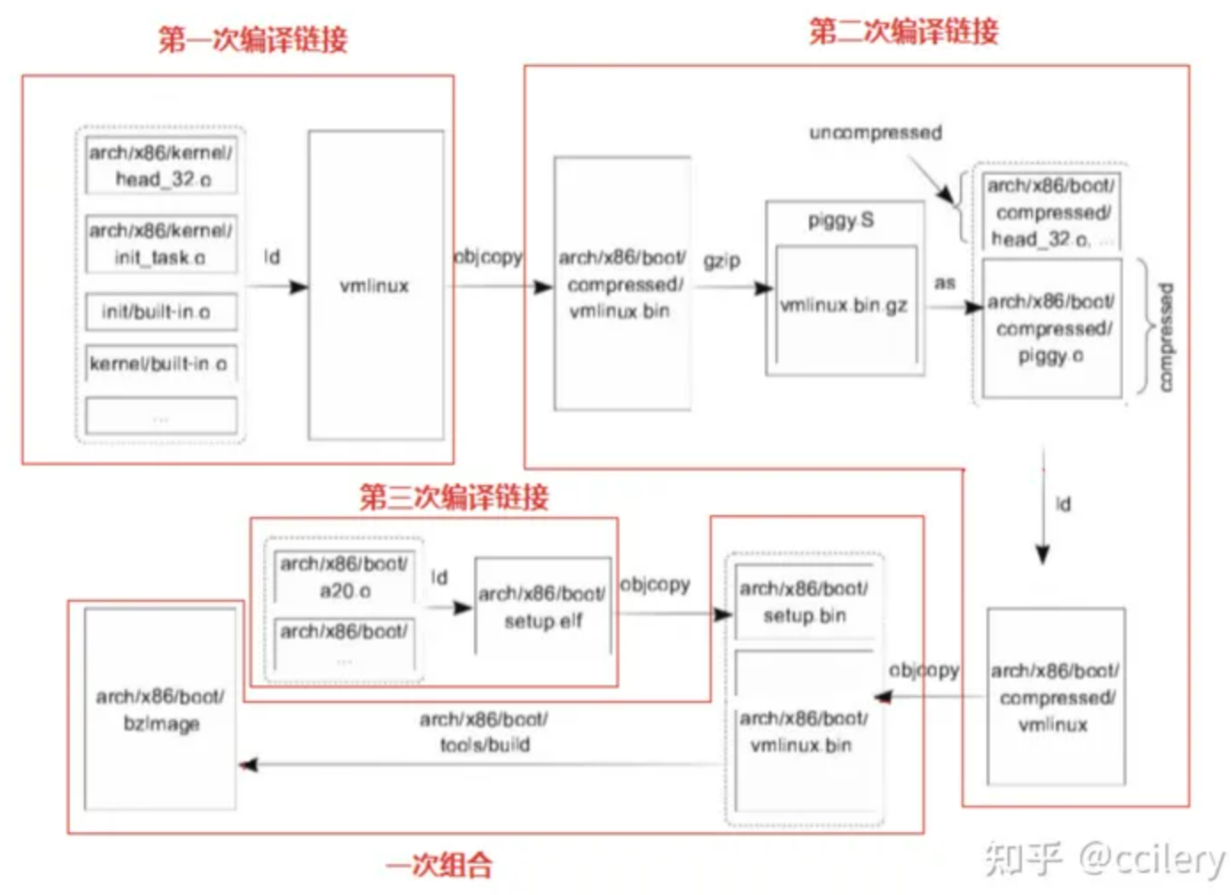
生成文件 内核的编译链接有三个阶段
vmlinux 1 2 3 4 root@Destroyer:/usr/src/linux-6.7# find . -name vmlinux ./arch/x86/boot/compressed/vmlinux ./vmlinux ./tools/perf/util/bpf_skel/vmlinux //这实际是vmlinux.h头文件
根目录下面这个带有调试符号的linux elf,不可以作为引导内核,是第一次编译链接的产物
linux/arch/x86/boot/compressed/vmlinux这个是和piggy等又链接过的,并且经过了压缩
bzImage 1 2 3 root@Destroyer:/usr/src/linux-6.7# find . -name bzImage ./arch/x86/boot/bzImage ./arch/x86_64/boot/bzImage
真的bzImage只有一个,只不过x86_64下面这个,是x86这个的链接
linux/arch/x86/boot/bzImage这个是最终产物,可以引导
vmlinuz 内核编译链接完毕后,在项目根目录make install,会在/boot/下面生成vmlinuz-<版本号>
这个vmlinuz-<版本号>实际上就是bzImage
1 2 3 4 5 root@Destroyer:/boot# ll /usr/src/linux-6.7/arch/x86/boot/bzImage -rw-r--r-- 1 root root 11801600 Feb 22 14:44 /usr/src/linux-6.7/arch/x86/boot/bzImage root@Destroyer:/boot# ll vmlinuz* -rw-r--r-- 1 root root 11801600 Feb 22 20:42 vmlinuz-6.7.0 -rw-r--r-- 1 root root 11801600 Feb 21 20:00 vmlinuz-6.7.0.old
qemu虚拟机 qemu的作用类似于vmware,但是可以更自由地配置,调试其上运行的内核
1 2 3 4 5 6 7 git clone https://gitee.com/qemu/qemu.git cd qemu mkdir build cd build ../configure make make install
之后就可以在任意目录使用qemu工具了
1 2 3 4 5 6 7 8 9 10 11 12 13 14 15 16 17 18 19 20 21 22 23 24 25 26 27 root@Destroyer:/home/dustball# qemu- qemu-edid qemu-system-i386w.exe qemu-system-riscv32w.exe qemu-edid.exe qemu-system-loongarch64.exe qemu-system-riscv64.exe qemu-ga qemu-system-loongarch64w.exe qemu-system-riscv64w.exe qemu-ga.exe qemu-system-m68k.exe qemu-system-rx.exe qemu-img qemu-system-m68kw.exe qemu-system-rxw.exe qemu-img.exe qemu-system-microblaze.exe qemu-system-s390x.exe qemu-io qemu-system-microblazeel.exe qemu-system-s390xw.exe qemu-io.exe qemu-system-microblazeelw.exe qemu-system-sh4.exe qemu-nbd qemu-system-microblazew.exe qemu-system-sh4eb.exe qemu-nbd.exe qemu-system-mips.exe qemu-system-sh4ebw.exe qemu-pr-helper qemu-system-mips64.exe qemu-system-sh4w.exe qemu-storage-daemon qemu-system-mips64el.exe qemu-system-sparc.exe qemu-storage-daemon.exe qemu-system-mips64elw.exe qemu-system-sparc64.exe qemu-system-aarch64.exe qemu-system-mips64w.exe qemu-system-sparc64w.exe qemu-system-aarch64w.exe qemu-system-mipsel.exe qemu-system-sparcw.exe qemu-system-alpha.exe qemu-system-mipselw.exe qemu-system-tricore.exe qemu-system-alphaw.exe qemu-system-mipsw.exe qemu-system-tricorew.exe qemu-system-arm.exe qemu-system-nios2.exe qemu-system-x86_64 qemu-system-armw.exe qemu-system-nios2w.exe qemu-system-x86_64.exe qemu-system-avr.exe qemu-system-or1k.exe qemu-system-x86_64w.exe qemu-system-avrw.exe qemu-system-or1kw.exe qemu-system-xtensa.exe qemu-system-cris.exe qemu-system-ppc.exe qemu-system-xtensaeb.exe qemu-system-crisw.exe qemu-system-ppc64.exe qemu-system-xtensaebw.exe qemu-system-hppa.exe qemu-system-ppc64w.exe qemu-system-xtensaw.exe qemu-system-hppaw.exe qemu-system-ppcw.exe qemu-uninstall.exe qemu-system-i386.exe qemu-system-riscv32.exe
这里带有system字样的是为了适应不同的架构
有qemu-system-x86_64就够了
qemu-img是创建虚拟磁盘使用的
如下是用qemu启动一个虚拟机的命令
1 2 3 4 5 6 7 8 9 qemu-system-x86_64 \ -m 512M \ -nographic \ -kernel ./bzImage \ -initrd ./rootfs.img \ -append "root=/dev/ram rw console=ttyS0 oops=panic panic=1 nokaslr" \ -smp cores=4,threads=2 \ -cpu kvm64 \ -s \
其中
-m是虚拟机运行内存
-kernel指定内核镜像文件在本机中的地址
-initrd指定内存文件系统,现在可以理解为磁盘
-append是启动参数
-smp指定多核多线程
-cpu指定虚拟CPU的类型
-s启动调试监听,允许gdb随时远程附加调试
那么什么是”内存文件系统”
内存文件系统 之前有一次安装kali虚拟机时,第一次开机没有进入到桌面,而是一个(initramfs)的shell
意思是,操作系统内核已经起来了,但是没有挂载根文件系统rootfs
那么什么是内存文件系统,什么是根文件系统呢
首先要明确,内核离了硬盘也是能活着的,可以用其他文件系统比如网络或者内存文件系统
内存文件系统是内核启动过程中使用的临时文件系统,内存文件系统(initrd或者initramfs)也是一个完整的linux目录树,并且在/bin下面有一套精简的命令工具集,比如busybox.在sbin下也有相关工具比如insmod,通常也是链接到/bin/busybox
这些工具在启动过程中可以供内核调用
1 2 3 4 5 6 7 8 9 10 11 12 root@Destroyer:/usr/src/busybox-1.36 .1 /_install# tree -L 1 . ├── bin ├── dev ├── etc ├── init ├── ktest.ko ├── linuxrc -> bin/busybox ├── proc ├── sbin ├── sys └── usr
内存文件系统也存放在磁盘上,通常在/boot/initrd.img
实际上就是上述目录树打包后的归档文件
这就意味着,kernel开始启动之前,内存文件系统已经被解包并且搬到内存里去了
这就意味着,得有一个东西,它知道磁盘上的文件系统格式比如ext4,并且能正确访问到/boot/initrd.img,并且能解包.
这个东西就是grub
内核使用临时文件系统起来之后,临时文件系统的init脚本会规定此阶段内核应该干什么,挂载硬盘就是这时候发生的
1 2 3 4 5 6 7 8 9 10 11 12 13 root@Destroyer:/usr/src/busybox-1.36.1/_install# cat init echo "INIT SCRIPT" mkdir /tmpmount -t proc none /proc mount -t sysfs none /sys mount -t devtmpfs none /dev mount -t debugfs none /sys/kernel/debug mount -t tmpfs none /tmp insmod /ktest.ko echo -e "Boot took $(cut -d' ' -f1 /proc/uptime) seconds" setsid /bin/cttyhack setuidgid 0 /bin/sh poweroff -f
这里面使用的命令比如insmod就是临时文件系统提供的
如果后续要挂载磁盘首先需要让内核知道磁盘上的文件系统格式,比如ext2
也就是说insmod ext2之后,内核才能识别并访问ext2格式化的磁盘.
即时磁盘上的文件系统中有ext2模块,有insmod命令,但是此时还没有挂载,没法使用
因此只能是临时文件系统提供这个功能
也就是说,内存文件系统为内核提供了一套必要的访问磁盘的工具
至于为什么叫做”内存文件系统”,因为整个initrd.img文件很小,会被全部加载进入内存,因此访问速度很快
制作linux临时文件系统 可以直接使用busybox
1 2 https://gitee.com/add358/busybox.git cd busybox
然后make menuconfig,
Settings->Build Options->Build static binary(no shared libs)选上
这一步的目的是将busybox静态链接,可以脱离glibc环境运行,因为内存文件系统很小,不需要glibc
Applets->Linux System Utilities->Support mounting NFS file systems on Linux < 2.6.23 (NEW)不选
这一步的目的是设置不挂载网络文件系统,为了精简大小
Applets->Networking Utilities->inetd不选
这一步的目的是不使用网络,为了精简大小
1 2 make -j$(nproc) make install
make install之后会在当前目录下生成一个_install目录
1 2 root@Destroyer:/home/dustball/busybox/_install# ls bin linuxrc sbin usr
也就是说,busybox提供了bin,sbin,usr三个目录的功能
usr下面的bin和sbin实际上是_install目录下两个同名目录的链接
然后bin,sbin里面的工具,也全是到bin/busybox的链接
也就是说,生成了一个busybox可执行程序,创建了一大堆链接
至于sys,dev等目录他不管,我们借助这个半成品加上这几个目录就可以构造一个临时文件系统了
1 mkdir -p proc sys dev etc/init.d
然后在当前目录下创建init脚本,规定内核启动时要干啥
1 2 3 4 5 6 7 8 9 10 11 #!/bin/sh echo "INIT SCRIPT" mkdir /tmp mount -t proc none /proc mount -t sysfs none /sys mount -t devtmpfs none /dev mount -t debugfs none /sys/kernel/debug mount -t tmpfs none /tmp echo -e "Boot took $(cut -d' ' -f1 /proc/uptime) seconds" setsid /bin/cttyhack setuidgid 0 /bin/sh poweroff -f
改一下文件权限
之后在_install目录打包整个临时文件系统
1 2 root@Destroyer:/home/dustball/busybox/_install# find . | cpio -o --format=newc > ../rootfs.img 5949 blocks
这会在上级目录生成一个rootfs.img归档文件
1 2 3 root@Destroyer:/home/dustball/busybox/_install# cd .. root@Destroyer:/home/dustball/busybox# file rootfs.img rootfs.img: ASCII cpio archive (SVR4 with no CRC)
这个文件就可以作为临时文件系统了
启动内核 把可以引导的内核镜像bzImage也搬到rootfs.img所在的目录来
1 root@Destroyer:/home/dustball/busybox# cp /usr/src/linux-6.7/arch/x86/boot/bzImage .
之后可以用qemu启动内核了
1 2 3 4 5 6 7 8 9 #!/bin/sh qemu-system-x86_64 \ -m 512M \ -nographic \ -kernel ./bzImage \ -initrd ./rootfs.img \ -append "root=/dev/ram rw console=ttyS0 oops=panic panic=1 nokaslr" \ -smp cores=4,threads=2 \ -cpu kvm64
如果没起来,报告找不到/dev/tty,可能是init脚本没有给执行权限
-m指定使用内存大小
-kernel指定内核镜像文件
-initrd指定临时文件系统文件
-append指定启动参数,
root=/dev/ram,根文件系统也使用临时文件系统 rw可读写
console=ttyS0,指定串口终端0,改成tty0或者ttyS1都看不到输出,还不清楚原因
oops=panic panic1 指定发生oops异常时,应该触发内核崩溃
nokaslr,方便调试关闭内核地址随机化
内存文件系统编译进内核 之前的内核是一个裸核,内存文件系统是单独制作然后用qemu启动的
可以直接编译进内核
1 https://blog.csdn.net/OnlyLove_/article/details/124565282
坏处是如果想要修改文件系统,需要重新编译内核
调试内核 启动内核时加上调试选项-s,这样就会在127.0.0.1:1234上开启监听端口
1 2 3 4 5 6 7 8 9 10 #!/bin/sh qemu-system-x86_64 \ -m 512M \ -nographic \ -kernel ./bzImage \ -initrd ./rootfs.img \ -append "root=/dev/ram rw console=ttyS0 oops=panic panic=1 nokaslr" \ -smp cores=4,threads=2 \ -cpu kvm64 \ -s
然后启动,再开一个终端,用gdb就可以远程调试了
1 pwndbg> target remote localhost:1234
添加调试信息 用于引导的bzImage已经去掉了调试信息,如果直接用gdb给start_kernel这种函数下断点,找不到符号
1 2 pwndbg> b start_kernel No symbol table is loaded. Use the "file" command .
vmlinux中保留有调试信息(编译时保留了调试信息比如dwarf5),将其作为调试符号来源
首先需要知道将vmlinux添加到哪里,也就是内核在内存中的地址
在gdb上c一下让调试内核能够自由执行,然后在被调试的内核上
1 2 /proc # cat /proc/iomem | grep "Kernel code" 01000000-01ffffff : Kernel code
也就是内核基地址在0x01000000
在gdb上添加调试符号(ctrl+C中断内核)
1 2 3 4 pwndbg> add-symbol-file ./vmlinux 0x01000000 add symbol table from file "./vmlinux" at .text_addr = 0x01000000 Reading symbols from ./vmlinux...done.
之后就可以在内核函数上下断点了
1 2 pwndbg> b start_kernel Breakpoint 1 at 0x1e457e0 : start_kernel. (2 locations)
也可以源码调试内核了
添加内核模块调试信息 类似的方法,需要知道的是内核模块在内存中的地址,作为调试符号输入的ko模块文件需要保留调试符号
至于如何保留内核模块的调试符号,需要加入gcc的编译选项-g,CFLAGS_MODULE=-g
Makefile这样写
1 2 3 4 5 6 7 8 9 10 root@Destroyer:/home/dustball/kd# cat Makefile obj-m += ktest.o KDIR = /usr/src/linux-6.7 all: $(MAKE) -C $(KDIR) M=$(PWD) modules CFLAGS_MODULE=-g clean: rm -rf *.o *.ko *.mod.* *.symvers *.order
新编译好的内核模块,注意放到_install下面之后重新cpio打包
给内核模块添加调试符号,首先需要知道该模块被加载到内存的地址
在gdb上c一下让内核继续
然后在被调试的内核上
1 2 /proc # cat /proc/modules ktest 12288 0 - Live 0xffffffffc0000000 (O)
也就是说内核模块ktest在0xffffffffc0000000
下面从gdb上为其加载符号
1 2 3 4 pwndbg> add-symbol-file ./ktest.ko 0xffffffffc0000000 add symbol table from file "./ktest.ko" at .text_addr = 0xffffffffc0000000 Reading symbols from ./ktest.ko...done.
之后就可以下断点,源码调试了
1 2 pwndbg> b ko_test_init Breakpoint 2 at 0xffffffffc0000000: file /home/dustball/kd/ktest.c, line 7.
内核数据结构 内核ROP 工具 用户态ROP利用gadget构造system("/bin/sh")
内核ROP利用gadget构造commit_creds(&init_cred)
ROPgadget 用户态pwn题常用ROPgadget
1 2 3 4 apt install python-capstone git clone https://gitee.com/pwn2security/ROPgadget.git cd ROPgadgetpython3 setup.py install
1 2 3 4 root@Destroyer:/home/dustball/kd# ROPgadget --binary /lib64/ld-linux-x86-64. so.2 --only "jmp" | grep rsp 0x00000000000010d5 : jmp rsproot@Destroyer:/home/dustball/kd# ROPgadget --binary /usr/src/linux-6.7 /vmlinux --only "jmp" | grep rsp 0xffffffff81220783 : jmp rsp
但是从内核vmlinux中找gadget比较慢
ropper 类似于ROPgadget,但是听说速度快点,没有验证
1 2 3 4 5 6 7 8 9 10 root@Destroyer:/home/dustball/kd# ropper -f /usr/src/linux-6.7/vmlinux --search "jmp rsp" [INFO] Load gadgets for section: LOAD [LOAD] loading... 88% [LOAD] loading... 100% [INFO] Load gadgets for section: LOAD [LOAD] loading... 100% [LOAD] removing double gadgets... 100% [INFO] Searching for gadgets: jmp rsp [INFO] File: /usr/src/linux-6.7/vmlinux 0xffffffff81220783: jmp rsp;
ropper的semantic功能,可以进行简单的静态语义分析,找到令rax=0这种gadget
linux/scripts/extract-vmlinux at master · torvalds/linux · GitHub
bzImage是一个经过压缩的内核,如果想要寻找gadget,必须使用一个未被压缩的elf文件,也就是vmlinux
如果题目给出了一个bzImage,可以用extract-vmlinux提取vmlinux
1 ./extract-vmlinux ./bzImage > vmlinux
cred结构 cred结构体管理进程权限,用户id等信息
1 2 3 4 5 6 7 8 9 10 11 12 13 14 15 16 17 18 19 20 21 22 23 24 25 26 27 28 29 30 31 32 33 34 35 36 37 38 39 40 41 42 43 44 45 46 47 48 49 50 51 52 53 54 55 56 57 58 59 60 61 62 63 struct cred { atomic_t usage; #ifdef CONFIG_DEBUG_CREDENTIALS atomic_t subscribers; void *put_addr; unsigned magic; #define CRED_MAGIC 0x43736564 #define CRED_MAGIC_DEAD 0x44656144 #endif kuid_t uid; kgid_t gid; kuid_t suid; kgid_t sgid; kuid_t euid; kgid_t egid; kuid_t fsuid; kgid_t fsgid; unsigned securebits; kernel_cap_t cap_inheritable; kernel_cap_t cap_permitted; kernel_cap_t cap_effective; kernel_cap_t cap_bset; kernel_cap_t cap_ambient; #ifdef CONFIG_KEYS unsigned char jit_keyring; struct key *session_keyring ; struct key *process_keyring ; struct key *thread_keyring ; struct key *request_key_auth ; #endif #ifdef CONFIG_SECURITY void *security; #endif struct user_struct *user ; struct user_namespace *user_ns ; struct group_info *group_info ; union { int non_rcu; struct rcu_head rcu ; }; } __randomize_layout; extern void __put_cred(struct cred *);extern void exit_creds (struct task_struct *) ;extern int copy_creds (struct task_struct *, unsigned long ) ;extern const struct cred *get_task_cred (struct task_struct *) ;extern struct cred *cred_alloc_blank (void ) ;extern struct cred *prepare_creds (void ) ;extern struct cred *prepare_exec_creds (void ) ;extern int commit_creds (struct cred *) ;extern void abort_creds (struct cred *) ;extern const struct cred *override_creds (const struct cred *) ;extern void revert_creds (const struct cred *) ;extern struct cred *prepare_kernel_cred (struct task_struct *) ;extern int change_create_files_as (struct cred *, struct inode *) ;extern int set_security_override (struct cred *, u32) ;extern int set_security_override_from_ctx (struct cred *, const char *) ;extern int set_create_files_as (struct cred *, struct inode *) ;extern int cred_fscmp (const struct cred *, const struct cred *) ;extern void __init cred_init (void ) ;
函数实现和init_cred这个预定义对象都在linux/kernel/cred.c中实现
1 2 3 4 5 6 7 8 9 10 11 12 13 14 15 16 17 18 19 20 21 22 23 24 25 26 27 28 29 #define GLOBAL_ROOT_UID KUIDT_INIT(0) #define GLOBAL_ROOT_GID KGIDT_INIT(0) struct cred init_cred = .usage = ATOMIC_INIT(4 ), #ifdef CONFIG_DEBUG_CREDENTIALS .subscribers = ATOMIC_INIT(2 ), .magic = CRED_MAGIC, #endif .uid = GLOBAL_ROOT_UID, .gid = GLOBAL_ROOT_GID, .suid = GLOBAL_ROOT_UID, .sgid = GLOBAL_ROOT_GID, .euid = GLOBAL_ROOT_UID, .egid = GLOBAL_ROOT_GID, .fsuid = GLOBAL_ROOT_UID, .fsgid = GLOBAL_ROOT_GID, .securebits = SECUREBITS_DEFAULT, .cap_inheritable = CAP_EMPTY_SET, .cap_permitted = CAP_FULL_SET, .cap_effective = CAP_FULL_SET, .cap_bset = CAP_FULL_SET, .user = INIT_USER, .user_ns = &init_user_ns, .group_info = &init_groups, };
这个init_cred是一个具有最高权限的cred,可以考虑使用它或者其拷贝进行提权
1 2 3 4 5 6 7 8 9 10 11 12 13 14 15 16 17 18 19 20 21 22 23 24 25 26 27 28 29 30 31 32 33 34 35 36 37 38 39 40 41 42 43 44 45 46 47 48 49 50 51 52 53 54 55 56 57 58 59 struct cred *prepare_creds (void ) { struct task_struct *task = const struct cred *old ; struct cred *new ; validate_process_creds(); new = kmem_cache_alloc(cred_jar, GFP_KERNEL); if (!new) return NULL ; kdebug("prepare_creds() alloc %p" , new); old = task->cred; memcpy (new, old, sizeof (struct cred)); new->non_rcu = 0 ; atomic_set (&new->usage, 1 ); set_cred_subscribers(new, 0 ); get_group_info(new->group_info); get_uid(new->user); get_user_ns(new->user_ns); #ifdef CONFIG_KEYS key_get(new->session_keyring); key_get(new->process_keyring); key_get(new->thread_keyring); key_get(new->request_key_auth); #endif #ifdef CONFIG_SECURITY new->security = NULL ; #endif if (security_prepare_creds(new, old, GFP_KERNEL_ACCOUNT) < 0 ) goto error; validate_creds(new); return new; error: abort_creds(new); return NULL ; } EXPORT_SYMBOL(prepare_creds);
强网杯2018-core 给了四个东西bzImage core.cpio start.sh vmlinux,其中
bzImage是内核镜像
1 2 root@Destroyer:/home/dustball/ctf-challenges/pwn/kernel/QWB2018-core/give_to_player# file bzImage bzImage: Linux kernel x86 boot executable bzImage, version 4.15.8 (simple@vps-simple)
vmlinux是带符号表的elf文件
1 2 root@Destroyer:/home/dustball/ctf-challenges/pwn/kernel/QWB2018-core/give_to_player# file vmlinux vmlinux: ELF 64-bit LSB executable, x86-64, version 1 (SYSV), statically linked, BuildID[sha1]=1d8344e71a82bc43821029796ef65bebfe8e65c3, not stripped
start.sh是qemu启动内核的脚本,
1 2 3 4 5 6 7 8 9 root@Destroyer:/home/dustball/ctf-challenges/pwn/kernel/QWB2018-core/give_to_player# cat start.sh qemu-system-x86_64 \ -m 64M \ -kernel ./bzImage \ -initrd ./core.cpio \ -append "root=/dev/ram rw console=ttyS0 oops=panic panic=1 quiet kaslr" \ -s \ -netdev user,id =t0, -device e1000,netdev=t0,id =nic0 \ -nographic \
-initrd ./core.cpio 指定使用core.cpio作为内存文件系统
kaslr 开启了内核地址随机化
-s 开启了调试
解包core.cpio看看文件系统里有啥
1 2 root@Destroyer:/home/dustball/ctf-challenges/pwn/kernel/QWB2018-core/give_to_player# file core.cpio core.cpio: gzip compressed data, last modified: Fri Oct 5 14:08:36 2018, max compression, from Unix
发现首先有一层gzip压缩
1 2 3 4 5 6 7 root@Destroyer:/home/dustball/ctf-challenges/pwn/kernel/QWB2018-core/give_to_player# mkdir core root@Destroyer:/home/dustball/ctf-challenges/pwn/kernel/QWB2018-core/give_to_player# cp core.cpio ./core root@Destroyer:/home/dustball/ctf-challenges/pwn/kernel/QWB2018-core/give_to_player# cd core root@Destroyer:/home/dustball/ctf-challenges/pwn/kernel/QWB2018-core/give_to_player/core# mv core.cpio core.cpio.gz root@Destroyer:/home/dustball/ctf-challenges/pwn/kernel/QWB2018-core/give_to_player/core# gunzip core.cpio.gz root@Destroyer:/home/dustball/ctf-challenges/pwn/kernel/QWB2018-core/give_to_player/core# file core.cpio core.cpio: ASCII cpio archive (SVR4 with no CRC)
这时候已经没有gzip包了,是一个cpio归档文件,解包用
1 root@Destroyer:/home/dustball/ctf-challenges/pwn/kernel/QWB2018-core/give_to_player/core# cpio -idm < core.cpio
解包之后是一个linux目录树,值得注意的是根目录下有两个shell脚本,gen_cpio.sh和init
这个gen_cpio.sh会递归查找当前目录为根的目录树打包成cpio归档文件,也就是制作文件系统用的
1 2 3 4 5 6 7 8 9 10 11 12 13 14 15 16 17 18 19 20 21 22 23 24 #!/bin/sh mount -t proc proc /proc mount -t sysfs sysfs /sys mount -t devtmpfs none /dev /sbin/mdev -s mkdir -p /dev/ptsmount -vt devpts -o gid=4,mode=620 none /dev/pts chmod 666 /dev/ptmxcat /proc/kallsyms > /tmp/kallsymsecho 1 > /proc/sys/kernel/kptr_restrictecho 1 > /proc/sys/kernel/dmesg_restrictifconfig eth0 up udhcpc -i eth0 ifconfig eth0 10.0.2.15 netmask 255.255.255.0 route add default gw 10.0.2.2 insmod /core.ko poweroff -d 120 -f & setsid /bin/cttyhack setuidgid 1000 /bin/sh echo 'sh end!\n' umount /proc umount /sys poweroff -d 0 -f
其中有五条关键指令
1 2 3 4 5 cat /proc/kallsyms > /tmp/kallsyms //将kallsyms内核符号表拷贝到.tmp下面,这就意味着普通用户可以读取echo 1 > /proc/sys/kernel/kptr_restrict //不允许普通用户读取kallsyms内核符号echo 1 > /proc/sys/kernel/dmesg_restrict //不允许普通用户读取dmesg内核消息insmod /core.ko //加载了一个内核模块叫core setsid /bin/cttyhack setuidgid 1000 /bin/sh //当前用户id 为1000,不是root
ida64打开core.ko看看是什么东西